Bead Furnace Burn July 1 2008
Creator: Neil
Materials: Cobb (Straw, clay, sand), charcoal, glass
Location: SCA Event - Trillium War
Notes: Electricity was not available, a lot of people trying their first beads.
We set the Mark 2 furnace up at an SCA event, hooked up the bellows, and allowed people to make beads while we explored our experimental questions. This was a very popular demonstration/workshop. In this case the questions being examined were
- Will this work with a bellows (we were quite sure it would)
- Did the bellows add any concerns
- Exploring the work dynamic further (just making beads to see what works best)
- What staff is required
- What is the consumption rate for charcoal
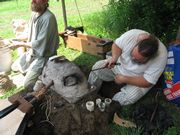
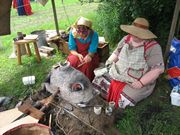
This is the overall setup for this burn. Two square holes were dug in the ground, the spoil was heaped up between the holes, and the furnace placed on top of the heap. This allowed a more comfortable working position that we had used previously. The bead maker or bellows operator could sit on the ground with their feet in the pit. This allows you to work sitting upright. The first photo is taken from the bellows side showing the openings for adding charcoal. The end of the bellows is just visible. Neil is seated in the position of one of the bead workers. Darrell kneeling on the left edge of the photo (working on the aristotle furnace) provides a contrasting working posture. Without the pits dug you would have to kneel or sit in a tailor's seat and lean down to see into the furnace. The next two photos show the working environment with two workers active. The annealing pot is in the chimney keeping the beads at an even temperature. Trying to work two people side by side was rather crowded (the smelter is after all only 60cm long). This is made more difficult when you are sharing hot tools and glass. The only common space is between the workers.
 |
 |
 |
|
| Setting up |
Two workers |
Furnace setup |
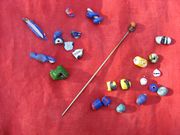
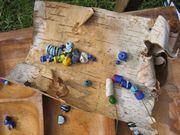
Finished beads. Two main fracture styles were common. One is shown by the blue/red bead on the bottom where it breaks across the hole turning into two beads. The other common break is shown by the light blue bead in the upper left. It is broken along the axis of the mandrel and thus useless. Several other beadmaking problems are also visible in these beads.
At the top is a blue spiral - instead of wrapping the glass onto the mandrel in a single clump the worker allowed the glass to move up the mandrel. To complete this as a long bead a significant amount of glass would have needed to be carefully applied. This wasn't done as the slip cracked from the offcenter pressure of the glass as it was wound.
The large green bead on the bottom of the left group did not spend enough time in the fire to shape itself into a bead. In this case also the slip broke and teh bead was aborted.
The light blue bead with dark blue decoration on the left (4 pieces) shows a good form as a bead. Two flaws are, however, visible. The dark blue glass was not allowed to fuse onto the body of the bead and shows as a raised texture. The piece closest to the pin also shows a spur on the upper edge. It was likely the increased resistance from that glass that caused the fracture.
The beads on the right show a higher quality, although the rate of fracture is still quite high. This is a clear indication that the annealing is not being accomplished correctly.
The second day's worth of bead production had a general improvement in the quality of production. Also of note is the larger number of smaller beads and generally lower breakage level.
 |
 |
| |
| Finished beads |
Day two |
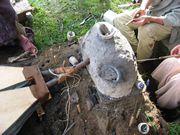
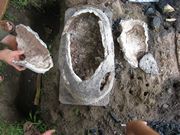
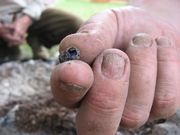
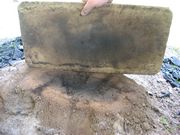
When we went to move the furnace, it broke. This provided us with an opportunity to examine the fragments and inside the furnace. Inside the ash at the bottom of the furnace, were small globs of glass that had broken off beads or rods. Several of these were found but I am not aware of any recorded in the archaeology.
The heat pattern is extremely visible not just on the bottom of the baseplate but below the supporting plate into the dirt. It would be interesting to check the pieces from Ribe for their patterns.
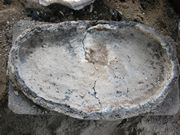
The bottom plate photographed from above is the equivalent of the only piece of a furnace from the archaeological record. Notice the remains of the walls still attached. Another excellent question would be to re-examine the Ribe piece to see if the walls were attached in the same way. My memory says that they were not. The closeup of the edge of a wall fragment shows that the clay is well sintered, but still it breaks in a way that exposes small openings. This is a result of the straw used with the clay to make the walls. These openings would make it easy for water to get inside the wall. As the water froze and expanded, then thawed over a thousand winters it would break the wall down.
As a part of the clean up the remains of the soup, washwater, and wall fragments were thrown into the holes dug for the worker's feet. I would think that any similar activity at Ribe would leave a clear trace, yet I do not recall any from the record.
 |
 |
 |
 |
| Broken furnace |
Glass spheres |
Base underside |
Furnace base |
 |
 |
 |
|
| Wall closeup |
Heat scars |
Disposal |
 Dark Ages Re-Creation Company