 Dark Ages Re-Creation Company


For the purposes of these early experiments I have not tried to produce a Norse bellows and use that to supply air. I substituted a blower to allow a fixed air source with no additional manpower requirements. Later experiments will be done with a bellows, once basic command of the materials has been achieved.
The first stage for this project was to construct a bead furnace. Construction was done with a clay cob (clay, sand, plant matter mix) as this material deals well with changes in temperature. The furnace was created using two lifts allowing a drying period between each lifts. The first lift set up the base and the first several inches of wall. At the suggestion of Trine Theut at Ribe I incorporated a feature not supported by the archaeology. The furnaces in use today at Ribe press a long tuyure into the base of the furnace from the outer edge to the center. This is then covered by a second layer of clay. This technique allows the air driven into the furnace to come up at the center of the working area rather than at one edge, providing a more evenly distributed heat.
The second lift completed the dome (leaving an opening at the top). The top opening acts as a chimney and provides a space to hold a crucible at a fairly constant temperature which can be used as an annealing area for the finished beads. It is important that the beads be allowed to cool as slowly as possible to prevent the glass from fracturing. A crucible left in this position will be gently heated at a temperature lower than the melting point as long as the furnace is in action, and the residual heat and charcoal burn will provide a slow cooling period. At Purdalpur today an area is cut into the wall of the furnace to provide this same annealing area1.
Openings were then cut on the front, and both sides of the furnace to allow fuel to be loaded and people to work.
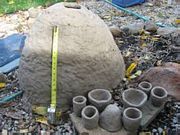
Finally additional clay was mixed (without the vegetable matter) to create a variety of crucibles. These ranged in size from 5 to 10 cm in diameter and were all proved too large to use conveniently. Although several pieces of crucibles are mentioned in the archaeological record, I have as yet not found any pieces recorded with measurements.

The furnace was covered over and allowed to dry for a week. When complete the furnace measured approximately 66cm x 48cm. This is significantly larger than the original artifacts. I had constructed the furnace by eye to what I thought were the approximate dimensions. In future construction additional effort to ensure the appropriate size should be used. The larger size likely hindered the effort to melt the glass.
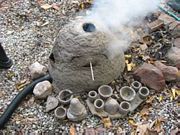
At this point the initial firing was prepared. The first step was to load the crucibles into the furnace so they could be sintered at the same time as the furnace. This was my first oversight as several crucibles would not fit into the available openings (including the crucibles planned for the annealing).
I left the large crucibles aside, but placed one of the annealing crucibles in position over the top opening, feeling that I might be able to sinter it in position there. This crucible did sinter well.
The heat began with a gentle wood fire, increasing to a forced air wood fire, then to forced air with charcoal. Temperature measurements done with a pyrometer during the wood firing gave values of 650°C at the top, 550°C at the bottom, and 65°C on the outside. When light air was added to charcoal the temperature increased to 750°C at both the top and bottom. It is worth noting that the final value must be considered suspect as the insulation on the probe kept burning off and the temperature reading immediately dropped. High temperature probes are clearly required to properly document future experiments.
I allowed the burn to continue for approximately two hours (until dark), then left the furnace to cool.
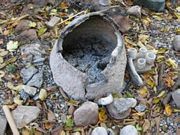
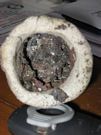
It is worth noting that although the inside of the furnace sintered the outside did not. The structure is also quite weak. Weathering will likely break the structure down to small pieces of sintered shell resting on the sintered portions of the base. It will be interesting to see it in the spring. This may correspond to the archaeological materials found in hearth UR at Ribe2. This particular hearth has a layer of small pieces of clay on top of the base. I would suggest that the general absence of such material (hearth UR is the only one with such material) indicates that the shell of the furnace was likely removed each year and rebuilt fresh on the base. The layering of sand and new bases at Ribe can be accounted for by the periodic refreshing of the site - putting a new building on the old location, adding a layer of sand to the floor, and building a new furnace. It is possible that at other locations as yet unreported fully sintered shells do exist.
The first firing with glass was where my second significant problem occurred. Since all of the materials were rather wet I used a small amount of gasoline to start the fire. The force of the original ignition was more than anticipated. Unfortunately the smelter dome was also weaker than I knew due to cracking in the clay. This caused several pieces to break removing a portion of the dome.
I rebuilt the dome, restarted the fire and allowed a longer burn to dry and sinter the new clay.
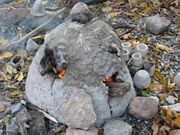
The addition of higher amounts of longer organic material (such as straw) to the cob would have provided additional strength in the material and should be noted for future builds.
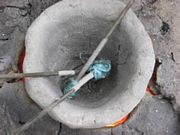
As the heat began to build I prepared two crucibles full of glass. Since Callmer3 has noted that beads have been created from iron smelter slag during the Viking era, I decided to try that first. The glass involved comes from two different points in the smelt process. A green, iron poor slag (location B Fig 1), and a dark black iron rich slag (location A Fig 1). Both of these materials I had available from previous smelts. These types of glass are very bubbly with carbon monoxide and carbon dioxide from the smelting process. I broke the glass up into 1-2 cm 3 pieces and loaded the crucibles.
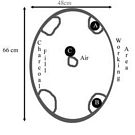
Fig. 1. Furnace layout for the first burn
As the heat progressed I switched to charcoal and forced air. Handling of the charcoal posed a learning experience. It is easy to add additional charcoal through the available openings but doing so seemed to reduce the available heat. When blacksmithing with charcoal this is less of an issue as the charcoal is added to the top of the pile and the metal is heated in the middle of the pile. Thus the fresh charcoal acts as additional insulation to the high internal temperatures while it heats to its own ignition. In a bead furnace with the crucibles around the outside this is not possible.
After some experimentation I developed a technique of raking ignited charcoal from one side of the furnace to the side with the crucibles, then adding fresh charcoal to the opposite side. This kept the hottest charcoal closest to the crucibles. It also proved difficult to ensure that the charcoal did not wind up in the crucibles. It is my belief that some custom tools would assist with this (a better charcoal rake, and a blowpipe to remove charcoal and ash from the crucibles).
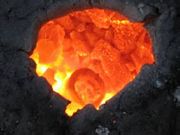
After an hour at high heat the iron poor glass had not begun to melt, and the iron rich glass was only slightly better. I added a third crucible of the iron rich glass to the hottest part of the furnace (Location C, Fig. 1; also image below). Within a half hour this glass had melted (and significantly reduced in volume). I added more prepared material to that crucible – which also melted. Encouraged, I decided to try producing a bead from the glass. I gathered together mandrels and other materials, positioned everything to be ready to hand and went to move the crucible closer to the working opening.
At this point I noticed that the charcoal between the air flow and crucible had burned off while my attention had been elsewhere, and the unheated air flowing against the crucible had cooled and solidified the glass.
As it was getting dark, I shut off the airflow and allowed the furnace to cool.
To further measure the heat I had added the cone indicators used by potters to the front face of the furnace. One each of cone 3, 5, and 7 was placed in the furnace. The cone 7 indicator broke and can’t be checked but both cone 3 and 5 show heat indications which implies that the temperature inside must have been at least 1205°C at some point. This should be sufficient to melt glass.
The results of the burn were reviewed the next day. The crucible with the iron poor slag (on the left of the working opening) had not melted appreciably. All of the pieces of glass appeared the same as when they were put into the crucible. The iron rich glass, on the other side of the working opening, had however gone through some change. Several pieces were fused together and many others had seen some surface melting, but the whole crucible full of glass had not reached a workable point.
There are two possible reasons for this problem. The first is that the fire control was not adequate to heat the crucibles appropriately. Although the temperature clearly did reach 1200°C at one location in the furnace for at least a small period of time, it is possible that the crucibles themselves were not heated to this temperature for a long enough time.
The second possible reason is that two different glasses were used in this first firing. They each have a different chemical composition and thus likely have different melting temperatures. Without more detailed information on the specific temperatures being reached at what locations and for how long, and the melting points of these two glasses it is not possible to know whether either or both of these reasons is the cause of the glass not melting. The fact that the third crucible did melt, however, provides solid proof that when the process is better controlled the furnace is capable of melting at least one of the glass slags.
In preparing for a second burn several changes were put into place. First a new crucible was added with modern lamp working glass (Location C, Fig 2). I assumed that this glass would have the lowest reasonable melting point and thus might be workable before the other glasses. The location of the crucibles was also changed to bring them into closer proximity to the airflow (Locations A&B, Fig 2). A new plan for working the charcoal was put into place. This time charcoal would be added to the front opening (above the air inlet) and raked into the center above the air (and between the crucibles) when it was hot. The tools for working the glass when hot were set up ready to hand. As a final step the charcoal would be roughly sized to a consistent size to allow for more even heating.
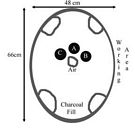
Fig. 2 Layout for second burn
With these changes in place a second firing began. Once past the preliminary heating into the forced air and charcoal changes occurred quickly. The lamp working glass began melting. The crucibles heated to a glowing heat on their inner face but remained cool on the outside. An attempt was made to address this by raking charcoal between and past the crucibles to try and keep them warm on all sides.
The two iron slag glasses never did appear to go liquid but the lamp worker’s glass did. This provided material to attempt the production of a few beads.
The initial attempt to make a bead was done by having one person bring the crucible to the opening using a pair of tongs while a second worker used a 30 cm metal puntil to remove the glass and wind it onto a second 30cm mandrel. The length of these mandrels matches the mandrel found at Ribe. The mandrel was coated in a thin layer of clay slip, traces of which can sometimes be seen in Viking era beads4 to assist in releasing the bead when complete.
Although this was partially successful the heat was too high to work comfortably even with welder’s gloves. The crucible began to cool almost immediately when removed from the coals making the glass harder to work.
A second set of mandrel and puntil were brought into play. These were the same 30cm metal rods but mounted into three foot wooden dowels. My wife and I took turns holding the crucible using tongs and trying to make a bead. The longer tools worked well but the wood was still too close to the heat and tended to ignite. Thus the tools became single-use as the metal ends slipped out. It was possible in three additional cases to wind glass onto the mandrel. Further working of the glass (by heating it on the mandrel and turning or marvering it) was not possible at the level requires as the wooden ends of the tool were unable to withstand the heat.
The extension of the mandrel and puntil did seem to help and I believe that with some adjustments to the furnace size (reducing the width the historical size) and the openings (providing more shelter to the wooden portions of the tools; that it should be possible to work the glass effectively.
In total four beads of wound glass were produced during this heat. They were placed into the annealing crucible, and the furnace allowed to cool.
Neither of the two crucibles with slag glass showed any indication of melting in this second firing. This could likely have been adjusted if I had paid more attention to these crucibles rather than focusing on the glass that was melting. Likely more familiarity with my materials would also have improved the results.
The four beads produced have clear flaws. Although winding the glass onto the mandrel was accomplished the normal second step of heating that glass until it forms a single bead shape just was not successful. Two beads clearly show this effect. One bead shows signs of the attempt to marver it against the crucible tongs - the shape is more cylindrical but still shows voids where the glass additions are not properly joined and has a very uneven end. The final tear drop shaped bead is the best. It represents an effort to reheat the glass and turn it in the furnace. Unfortunately there was not time to finish the process before the wooden rod had burned far enough to release the metal tip of the mandrel.
A future range of firings for next season is planned with the following additions.
The furnace itself must be produced in a smaller size. If made closer to the original dimensions it is likely that a higher and more evenly distributed temperature could be maintained. Additional care in the construction of the openings to place them lower would allow easier access to the metals. The lip should also be constructed to provide more protection for the wooden portion of the mandrel.
A lower top should also aid in maintaining the interior temperature. The use of an integrated tuyure with central air opening left clear traces in the furnace remains that do not match the archaeological remains. It should be possible to work with a normal inlet for the air and to organize the crucibles, air, charcoal, and work areas in such a way as to provide an adequate temperature and working environment. It is likely that it will require several more burns to determine an optimum arrangement.
Metal tools similar to the mandrel found at Ribe are required5. A length of metal around 30 cm with a tapered end for the bead is needed which can then be attached to wood. Four mandrels and two puntils would seem to provide a reasonable selection of tools to begin.
A small fire scoop/rake is also required for finer control of the charcoal.
A small scoop for adding additional glass to the crucibles would be useful although depending on design the rake mentioned above may serve well.
Experiments with tesserae from a variety of sources will be needed to find materials that match the available colours and have a low enough melting point to be workable. Further experiments are needed to determine if glass can be added during the heat or if it would require too much time to melt. An additional question is whether the tesserae are best added in their natural state or should they be pre-ground to reduce the time needed to melt them.
Although no rake or scoop has been found in conjunction with glass making in the Viking era it is likely that these tools exist in other fire-control contexts such as blacksmithing, casting, or ceramics. Additional research may provide extant material remains.
The slag glass should also be prepared by grinding to remove the volume used by the gases. This will reduce the need to re-load the crucible and the required delay to melt the new glass.
Experience to date indicates that this work is best performed in a multi-person environment. Ignoring staff required to work the bellows it would still be more effective to have one person tending the heat and arranging the charcoal while 1 or 2 glassworkers concentrate on making beads. With proper arrangement of work openings and crucibles it should be possible for one person to scoop their own glass to load their mandrel and then make a bead.
The openings for this work will also need adjustment. The openings must be large enough to allow the tools to reach the desired materials while not being so large as to release all of the heat. Adjusting these variables will also require several additional furnace builds.
The crucible in the top opening of the furnace appeared to work well to anneal the beads, however additional time is needed to ensure that the beads are in fact stable (ideally several weeks involving a range of temperatures).
The crucibles also require minor changes for the next firing. Smaller crucibles with lower walls to allow easier access will make manipulating the material without moving the crucibles significantly easier. The lower walls may allow more ash and charcoal to contact the glass so lids may a useful addition.
This project met its specific goal of producing a furnace that could melt glass. Techniques for the construction of such a furnace and a range of problems with the first prototype were uncovered which should lead to increased probability of success in future burns. Specific shortfalls in the working tools were also uncovered in the two burns performed. A project to produce these tools will be the first priority.
It is encouraging that these experiments did produce glass beads using materials reasonably compatible with the finds at Ribe. The errors and problems associated with these experiments could have been minimized if there had been an available apprenticeship program as was (at least informally) likely how the original bead makers at Ribe learned their trade.
1. Torben Sode Purdalpur, a glass bead-making village in Northern India in Rasmussen, et al., 1992
2. Torben Sode Glass Bead Making Technology in Bencard et al., 2004