| Absolute Time |
Elapsed Time |
Notes |
| 1506h |
|
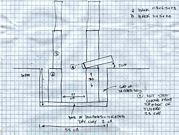
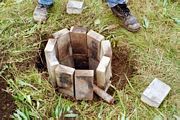
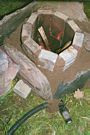
A hole 55cm across and 25 to 37 cm deep (depending on which part of the
not-even-remotely-level ground we measured against). A base of dried clay
was laid approximately 4 cm thick (when compacted). |
| 1532h |
T+0:26 |
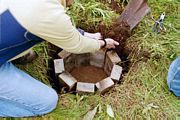
On this base we built a circle of 9 firebricks standing on end (this produced
a rough circle 22.5 cm deep and 27cm across). The hole was then backfilled
with soil and tamped into place. |
| 1540h |
T+0:34 |
The airpipe was rested on this brick and ground outside producing the
20 degree down angle we were looking for. A second circle on fire bricks
went on. |
| 1650h |
T+1:44 |
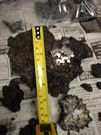
At this point is was necessary to mix up some clay to use to caulk the
seams between the bricks. During this time we also measured the ore charges
from some extra roasted ore we had lying around. 8 chares each of 1 Kg were
prepared. The caulking was applied and the outside of the bricks was also
given a band of clay. |
| 1751h |
T+2:45 |
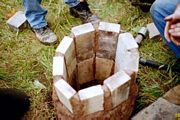
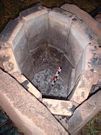
A third layer of bricks went up and was also caulked with clay. This gave
us a total stack height of 67.5 cm, a diameter of 27cm, and a bowl of 22.5
cm depth below the tuyure to hold the slag. |
| 1811h |
T+3:05 |
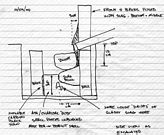
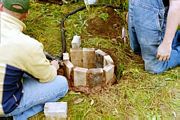
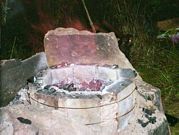
We then raised some large stone slabs into a box around the smelter and
backfilled with sand. Then it was time to start a warming fire that would
also dry the clay. |
| 1823h |
T+3:17 |
To stabilize the airflow, and help with our low numbers of people, this
year we were using an old vacuum cleaner with a rheostat to control the
power and hence the airflow. The air was turned on to level "A"
(just enough to start an air flow). |
| 1910h |
T+4:04 |
Airflow was increased to "B". |
| 1945h |
T+4:39 |
Airflow was shut off for a moment while the smelter was filled with charcoal.
Airflow was then restored. This is a good point to mention a minor change
in our handling of the charcoal. This year with our "fast" concept
(and rapidly approaching night) we did not screen the charcoal but did a
visual inspection to keep the chunk size down. Larger pieces were broken
up with an axe. |
| 1957h |
T+4:51 |
the charcoal level had dropped by 15 cm (more on the tuyure side, less
on the back). The smelter was re-filled with charcoal. |
| 2001h |
T+ 4:55 |
The airflow was increased half way up to "C". This produced
a nice loud "jet-like roar" from the smelter. |
| 2008h |
T+5:02 |
Temperature check with the optical pyrometer. 2950 deg. F. Too hot. So
we reset the air to "B". More charcoal was added as the level
had dropped 10 cm. |
| 2020h |
T+5:14 |
It just wouldn't be us if SOMETHING didn't go wrong. This time the power
cut out and we lost airflow. For the next 19 minutes we had intermittent
airflow. The good news is that at this point we were only warming the smelter
so it didn't really impact us. Also during this time the lovely blue flames
of a reducing fire appeared above the charcoal. |
| 2033h |
T+5:27 |
10 cm of charcoal added (power still intermittent) |
| 2044h |
T+5:38 |
10 cm of charcoal added. |
| 2059h |
T+5:53 |
Temperature now 2580 (F) and the first charge or ore was added. 7.5 cm
of charcoal was also added. |
| 2114h |
T+6:08 |
Ore charge #2 was added along with 10cm of charcoal. |
| 2125h |
T+6:19 |
Ore charge #3 was added to the back half of the smelter and 7.5 cm of
charcoal. |
| 2134h |
T+6:28 |
Ore charge #4 was added to the back half of the smelter along with 12
cm of charcoal. |
| 2144h |
T+6:38 |
Ore charge #5 added to the back half with 10cm of charcoal. At this point
charge #1 should have worked its was down to the "hot spot" in
front of the tuyure. Another temperature check was made showing 2520 (F). |
| 2151h |
T+6:45 |
The burn seemed a little high to us so the air was reduced to A+ 3/4.
The "jet roar" had been getting louder for the past little while.
Reducing the airflow left the roar going but without as much volume. |
| 2152h |
T+6:46 |
Ore charge #6 was added to the back half with 10 cm of charcoal. By now
the first two charges should have been in the hot spot. |
| 2207h |
T+7:01 |
Ore charge #7 added to the back half with 10 cm of charcoal. At this point
the first 3 charges should be in front of the hot pot. |
| 2222h |
T+7:16 |
10 cm of charcoal added. The first four charges should now be in the hot
spot. |
| 2237h |
T+7:31 |
10 cm of charcoal added. By now five charges should be in the hot spot. |
| 2250h |
T+7:44 |
10 cm of charcoal added. At this point 6 charges should be in the hot
spot with the final charge only 5 cm higher. Around this point we observed
that additional yellow (oxidizing) flame was appearing across the surface
of the charcoal. Lots of blue flame still. |
| 2303h |
T+7:57 |
The reduction charge was added across the clear burn line (about 1/3 of
the way back from the tuyure) along with 7.5 cm of charcoal. |
| 2319h |
T+8:13 |
10 cm of charcoal added. Yellow flames had mostly vanished by this point. |
| 2331h |
T+8:25 |
7.5 cm of charcoal added. |
| 2343h |
T+8:37 |
10 cm of charcoal added. Some yellow flames are beginning to reappear.
The reducing charge should be about 10cm above the hot spot. |
| 0002h |
T+8:56 |
The charcoal level had dropped 15 cm so we decided it was time to empty
the smelter. Note that it was now 2 minutes after midnight -- a true DARK
event! Airflow was reduced to "A" |
| 0004h |
T+8:58 |
The first charcoal was scooped out the smelter. |
| 0015h |
T+9:09 |
|
| 0021h |
T+9:15 |
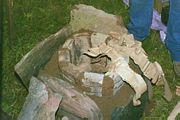
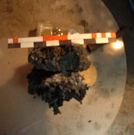
First two bricks are now visible and the bloom was very apparent. |
| 0023h |
T+9:17 |
We used a large (wet) log to pound on the bloom while it was still hot
to consolidate it as much as possible before removing it. |
| 0035h |
T+9:29 |
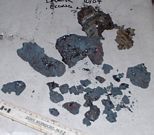
Two lumps of slag came out on the scoop. |
| 0036h |
T+9:30 |
The bloom was pulled out, set on a rock and pounded on by Darrell. This
was interesting to watch as you could see the lump jump from the force involved
but very little compression was achieved. |
| 0039h |
T+9:33 |
Final photos of the bloom and head inside to celebrate! |
 Dark Ages Re-Creation Company