sml logo Dark Ages Re-Creation Company sml logo

Sunday, July 26, 2009

Two Icelandic Museums

Two museum visits so far and about time to start talking about them. The first was Vikingaheimar.

This is a new museum (opened this year) housing Íslendingur, a knarr built by folks here in Iceland and sailed over to L'anse Aux Meadows in 2000. The museum is a little sparse for content but that isn't surprising with the money situation in Iceland. -- For those who don't know the banking crisis hit this tiny country very hard, with the three biggest banks going belly up, and the British and Dutch governments holding the country hostage to get repaid for deposits by their people. -- The museum was completed and opened which is a big credit to the people who worked on bringing it about.

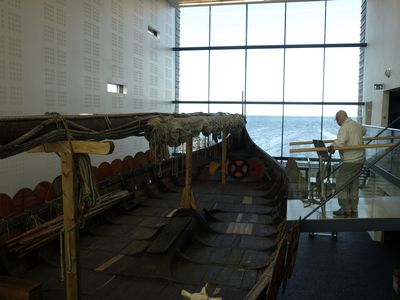
The museum itself is Well laid out with the largest hall housing the boat which is displayed to provide wonderful visibility into, and under, the boat. There are view areas on the second floor allowing visitors to look down on the main deck, and on the main floors to allow visitors to walk underneath it. There is significant content about the creation of the ship and its voyage which is wonderful to see.

The remaining rooms have reasonable content, the layout gives you time and space to examine the artefacts, a very nice mural and room to expand the collection as time and money allow. Plus - they allowed pictures and the lighting wasn't awful! This is an important thing in a museum in my opinion, made even better by the listing of artefact numbers with the text about the item allowing easy followup with the curatorial staff. The text had a good balance of overall context and some information about the particular artefact. It didn't go into all of the detail that I might want to see but then again, I am not the average visitor. The gift store had a reasonable collection of books, but the other content was a bit sparse. Overall, it's well worth the time and money to visit, likely even more so as the years pass if they continue to build the content.


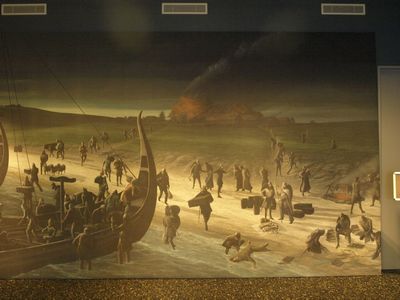
Part of the mural showing the raid on Lindisfarne.


Three of the arrowheads in the exhibit along with their associated text.

Clearly having too much time on his hands, Thorgrimr carved a small norse figure completing it just before our last get together. Needless to say the timing of this and our trip was too much fun to pass up - so we decided to drag Snorri along with us.


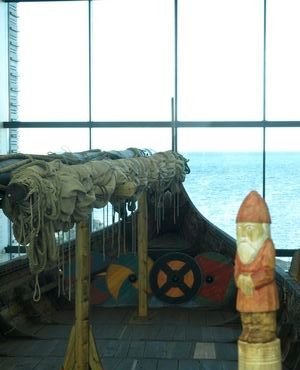
Here we see Snorri posing on the top deck of the Islandingur. Worth noting as a future expansion is that the back end of the boat has four nice boxes in it. All of them were closed - a nice addition would be to open one and show some of what would be stored in it. As a second point, surely ONE of them could be carved to allow a nice game of tafl while sailing? I think it might also be nice to put out an oar or two to allow people to see them in relation to the size of the boat and benches.


Part of the top viewing area allowing you to step quite close to the top of the boat and see each part of it.

The second museum was at Eiriksstaðir.

This museum is the likely first home of Eirik the Red's married life. It was occupied for only 10-20 years before he had to move on "due to some killings". The museum itself has a small staff shack, a set of washrooms, a half dozen full sized poster boards with the site history in four languages (Icelandic, English, German, and one of the Scandinavian languages). Just slightly uphill from the signs is the actual remains covered over again but with the wall outline shown as at L'anse Aux Meadows. A few yards off to one side is the reconstructed house where you find the two re-enactors.


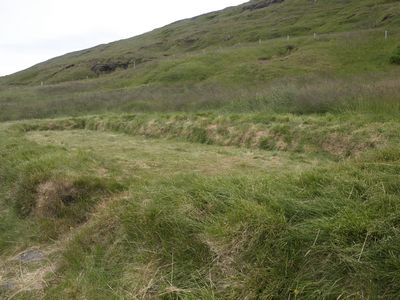
These are the re-buried remains of the original longhouse. Surprisingly small actually (4x12 m).


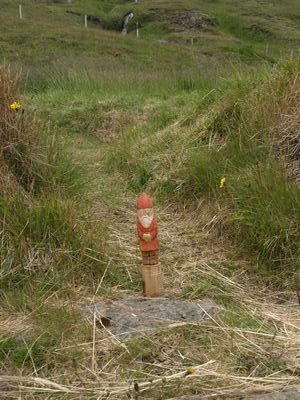
Here we see Snorri about to enter the archaeological remains of the original house.


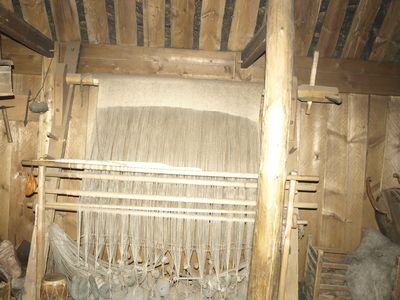
The loom in the reconstructed house. I'll leave it to Karen to go into details about the differences between this "Icelandic" style loom and the scandinavian looms. The staff did mention that they don't work on the loom anymore as they had a lot of difficulty with it - wonder why....

They also mentioned that the fire keeps things dry enough inside that they are getting some heavy checking on the wood pillars. They often boil water (over the propane fire) to help increase the humidity.


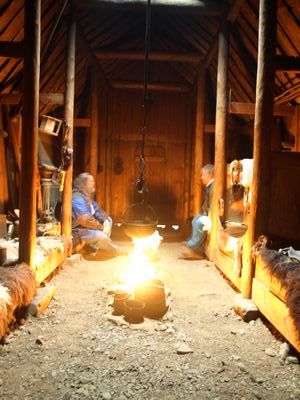
Karen grabbed this wonderful shot of my enjoying a story from the male staff member - funny we talked for a long time about a range of topics, I left each of them with a DARC card but none of us thought to introduce ourselves by name (or ask the other's name) - the things that don't occur to you until later... We will have to follow up by email with them later. In any case their presentation is entirely in third person story telling. They talk through the story of Eirik and Leif, birth, exile, new lands, all of it. There are only a very few staff members working now (a shame). The hall is fairly nice, and like the houses at L'anse Aux Meadows it cuts out the outside wind noise perfectly. It is, however, very heavily equipped. Multiple spears, a sword, multiple axes, many shields, sheepskins everywhere, bric a brac tucked in every corner, lots of clothes on the walls.


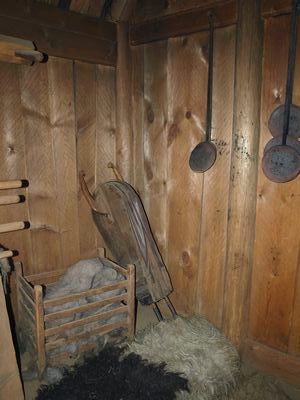
A bellows (not right for viking age unless they know something we don't) and an example of the equipment load - that is 4 frypans on the wall - riches!


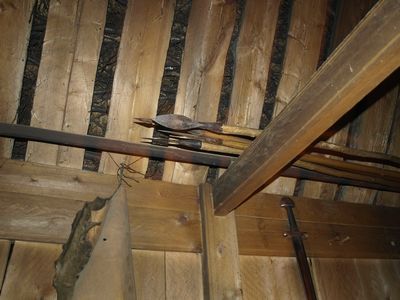
Some of the many weapons around the house.


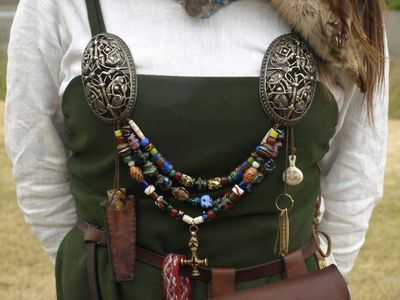
A closeup of the jewelry of the female interpreter (get the NAMES next time!). Being interested in beads, this was especially of interest to me. The middle strand she called out as a gift from a bead maker (extremely modern styles), the other two strands have a mix of the good and the bad. I'm not sure about the broaches, lovely work but they are cut-outs without a solid backing. Like a two piece broach without the underlying piece. Must look into this to see if any finds match that.


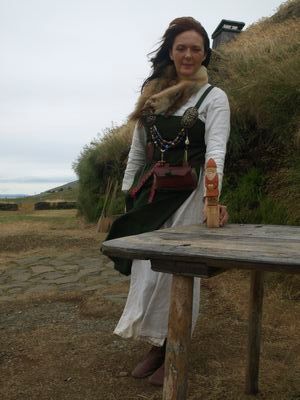
And just for fun the nice lady posed with Snorri allowing the costume types a look at her outfit. (nice fox as a scarf)

Overall, most definitely worth the time and money to visit. The folks there are quite knowledgeable about the history involved but not as much about the artefacts and they don't seem to be as active in the research. This is more of an acting arrangement.

Labels: , , ,

Wednesday, July 22, 2009

IRON Mandrils - Iron Oxide bead release?

"Ancient beads were often made on cast iron tapered rods, without the use of a separating agent. Once a bead was finished, the rod was heated to red-hot and plunged into a container of salt. This created a chemical reaction, causing the cast iron to rust and the bead could be easily tapped off the rod."


Quote from www.timelessbeads.net/islamic_folded.htm

(Note: In all fairness to Jhan, her interest lies in duplication of historic beads using modern flame working tools and methods. She clearly references that someone else told her this, so I am not critical of her otherwise quite good web site!)

First, what is being referred to here are artifact wrought iron mandrils. Two have been found in the Viking Age layers at Ribe, Denmark. (This is the focus of interest of Neil Peterson's experiments with DARC.)

As an experienced metal worker, I do want to stress the actual material. There is a significant difference, both chemically and structurally, between the various different iron based metals that might have been used. This also extends significantly to the oxidation rates.
I know that 'cast' iron was not used historically. This high carbon alloy was not clearly understood or widely employed for any purposes until into late Renaissance times (varies depending on location, much earlier in the East).
Most likely is some form of bloomery or wrought iron, the low carbon material most commonly used for all forged objects up till the Industrial age.
For comparison, modern mandrills are typically a nickel alloy (stainless) which basically did not exist until fairly recently (the Modern Age - say 1900). This material is used because of its great *resistance* to oxidation.

I have made up one actual 'wrought iron' mandrill, using antique recycled metal (on a guess from the late 1800's). This specific material most closely matches the bloomery iron that would have been available during the Viking Age. The form is (loosely) based on one of the artifacts from Ribe. The shaft is about 30 cm lng and is mounted into a wooden handle. The fairly heavy cylindrical body shoulders in near the tip for about the last 3 - cm. The diameter here is roughly 3 mm, tapering slightly to the end. To date we have primarily been using a fairly standard method of coating the working area with a clay resist.

I have reservations that the theoretical salt water quench method as described would actually work in practice. There are two primary forms of iron oxide in play here. Chemically these are Fe3O4 or Fe2O3:

The first (Fe3O4) is the high temperature form - black oxide or fire scale. It is hard, brittle, and adheres both tightly and strongly to the parent metal. Its formation is fast - due to the temperatures (above about 450 C or so). I just can not see this being of any value to the bead making process, as the glass strongly attaches to this layer, then due to the bond between the oxide and the metal, it remains firmly in place.

The second (Fe2O3) is the low temperature form - red oxide or rust. This layer is soft and crumbly, and breaks away easily under any mechanical pressure. Generally this is a slower formation, taking place at room temperatures. This process is accelerated (ask the chemists why) by water, and a bit more so by salt water. Now, it might be possible to use this layer as resist, as it does easily break free from the parent metal. This layer is certainly extremely thin. This presents two problems. First - there is not much separation layer to begin with, so it would be extremely easy to scrape it completely off and expose the metal underneath. Second - the layer is so thin that it conforms closely to the shape of the parent bar. The interior of the glass wraps tightly around any irregularities in the metal mandril. Although every attempt is made to produce a mandril with a perfect cylinder, or a slight conical section, one of the functions of a thicker resist layer is to lift the glass away from any imperfections. Such a thin layer as the oxide would create would just not give enough gap between metal and glass.

I should mention that one observation I have from forging actual wrought iron is that when it is quenched from incandescent in water, often a thin film of red iron oxide will form on the surface. As suggested, the quality of the iron does effect this. However, given the problem of creating a suitable 'release gap' I still think that this natural oxide layer is just not thick enough. Even with the slight acceleration produced though the use of salt water, the layer of Fe2O3 created would far to thin to be significantly useful here.

I suspect that this whole idea was theoretically reverse engineered to explain observations of a special situation. I believe (?) some glass beads were found to have a very thin layer of iron oxide in the interiors of the holes. How to explain this? Pair this observation with the discovery of a couple of wrought iron mandrils. Presto! A working method, now enshrined in the literature (although never actually tested). Repeat that WAG, until it has become an accepted method (still not tested).

An alternative : given the wide availability of various iron oxides as ochre deposits, perhaps a well known resist material was simple red ochre mixed with water as a paste. This applied just as we do our fine clay. This is a method that would be easy to test experimentally.

Additional tests:
- As Neil Peterson has mentioned, examine only BROKEN artifact bead fragments from production sites to check for the presence of resist. We know that the thin clay layer is fragile, and relatively quickly will clean away from the interior of any bead actually worn on a string. This does tell us beads found removed from production sites may not yield useful information.
- We tend to take a very long time to make a single bead. Historic production work is sure to be much faster. The way the clay interfaces to the glass is sure to be time dependent. Is there any way to check on this?

Labels: ,

Monday, July 20, 2009

Working System - Bead Furnace


Peterson Mk 5 Bead Furnace - July 18. 2009Showing the overall layout of working ports on the furnace

The Mk 5 furnace is again laid out with working areas for two people, one on either end of a roughly oval furnace, which has air input and charcoal loading on either sides of the centre. At the top centre is a built in cup for annealing, for this test holding sieved wood ash. The loading port (not seen here) has a second cup which inserts into the opening. In this test this second cup held vermiculite.
Each worker has the choice of using an upper port, allowing for manipulation of the glass in the hot exhaust gasses. A second covered port in the side of the wall can be opened, allowing for working down inside the body of the furnace. This method was used for experiments with tesseri. (see the video segment posted earlier)

A thermocouple type pyrometer was employed to roughly measure exhaust gas temperatures at one of the top ports over the experiment. A roughly 6 mm (1/4 inch) diameter hole was drilled into the wall of the furnace, just down from the lip of of the port. The probe was extended into the opening about 1 cm. Although the probe was placed early in the experiment, and readings were constantly monitored, unfortunately the recorded data only extended over a relatively short time sequence:

Temperature Data (C)


TIMETEMPEVENT


1:03900
1:041000
1:07900
1:09700
1:10800
1:11
charcoal fill


change method
1:15755
1:16655

adjust charcoal
1:17925
1:18810
1:19850
1:20890


adjust charcoal
1:21910
1:22830
1:23860
1:24870
1:25840
1:26850
1:27820

Darrell Markewitz

Labels:

Sunday, July 19, 2009

Beadmaking - Working with Tesseri


Neil and Karen from DARC held a workshop / experimental session on Saturday July 18. A small group of us spent the afternoon working with the Mark 5 charcoal bead furnace, primarily working out the best firing dynamics and continuing to transfer our skills with modern torch working methods backwards into the Viking Age.

The furnace used above is based on base plates found in the excavations at Ribe, Denmark. The superstructure remains speculative, being refined in detail as our working experience increases with the equipment. With each session, the ratio of successfully completed beads increases - a sure sign that something is improving!

One note - for this last session, a modern electric blower was used to supply the needed air.

(Darrell)

Labels:

Bead Furnace - scaled drawing


This diagram style drawing was created from measurements taken on July 18 at the bead experiment session hosted by Neil and Karen.

Labels:

Friday, July 17, 2009

Email on Beads

I got an interesting email this morning that deserves sharing. I have reworded the query a bit as the original email was from a non-english speaker (who did a reasonable job asking his question in my language - which is always appreciated).

> Could you explain the bead indexes Callmer uses?
> For example:
> B 422 Dark Blue T.
> I am interested in B422 (number of graves, number of beads found)?

While I am not ready to email people with information about each and every kind of bead in depth, this provides a good opportunity to discuss this further.

In 1977 Johann Callmer wrote a thesis TRADE BEADS AND BEAD TRADE IN SCANDINAVIA ca. 800-1000 A.D. (ISBN: 91-40-04466-1). Although there are significant problems with his typology the fact is that no-one has offered a better or more complete model, and it serves well for comparing beads.

In it Callmer tagged beads according to various criteria:
Length - measured along the string
Diameter - measured across the string
Proportion - the ratio of these two numbers
Colour - the background colour of the bead
Transparency - how clear the bead is
Decoration - is it monochrome or what kinds of decoration are applied
shape - the overall shape of the bead
construction method - drawn or worked
material - glass, stone, etc

Classes (such as B422) were then made by taking beads with similar criteria. The classes were then examined for trends.

B422 is one of those classes. They are decorated glass beads (type B) with a Dark Blue (colour 214) Transparent (translucency=181) base glass. The beads are cylindrical (shape=127), or rounded with (shape=124) or without (shape=122) flat ends. (see http://www.darkcompany.ca/beads/BeadShapes.php for shape pictures)

The length of the bead is at least 1/2 of the diameter (proportions 152, 153 and 154). The diameter is between 9 and 23 mm (size=164 to 168). It is decorated with a variety of types of lines (lines 311-315 in patterns 742,722,829,828,788,792 see his Fig 2 and Fig 3 for the patterns involved).

All of these definitions are in chapter 3 of the thesis.

In Table 1 Callmer tells us that B422 was popular in BPI(790-820), and dieing off in BPII(820-845). It isn't found again until BPVII(885-915), peaks again in BPVII(915-950) and finally vanishes during BPVI(950-960).

In Chatper 2 he documents 14 graves with 21 of these beads. Worth noting is UUM 4318 UP, Häggeby parish, Overhassla which has 5 of the 21 beads. The other graves are all 1 or 2 beads.

It is occasionally possible to get Callmer as a used book, and Inter Library Loans can pull it from many larger universities. This is an excellent source to begin looking at beads in the Viking Era.

Neil

Labels:

Wednesday, July 15, 2009

Three New Activity Pages

We will likely still add some more pictures and links there are three new pages up on the site.

http://www.darkcompany.ca/beads/bead0509/
- a bead melt with two furnaces. Not a very successful day but a chance to try a new furnace design.
http://www.darkcompany.ca/beads/bead0709/
- another bead melt with two furnaces. Much more successful with training for many new bead makers.

http://www.darkcompany.ca/iron0509/
- our most recent iron smelt - the first try at the reproduction of the smelter from L'anse aux Meadows.

Neil

Labels: ,

Saturday, July 11, 2009

Gas Jet Bead Furnace MK 3

(cross posted from 'Hammered Out Bits')
... referred to (why?) by Neil and Jean as the 'tea pot' style.

{ed.Karen: because it looks like a teapot:) }

About the time Neil Peterson got seriously interested in compiling tables detailing just what forms, colours and shapes were common during the Viking Age, I had been introduced to the modern methods of making lampwork beads. At Dan Nickels' 'Folly in the Forge' workshop, a local glass bead maker had demonstrated the basic technique. Along with fellow blacksmiths David Robertson and Janis Book, some basic supplies and Corina Tettinger's (excellent) manual 'Passing the Flame' were purchased. Over the next several months, I had made about 100 beads using my oxy-propane torches, gaining at least a basic understanding of how tohandle hot glass in rod form.

Neil's experiments proceeded with a furnace based on the base plate remains from Ribe, Denmark, with a superstructure suggested by traditional Indian models. These used a dome like enclosure, with small working ports into the interior to contain the required heat. The glass would be manipulated inside the furnace through these ports. Neil is now working his fifth version based on this system.

In spring 2008, I had a chance to meet with Trene Theut, an artisan interpreter at the Ribe Viking Centre, and its glass bead specialist. At that meet, Trene described her most recent experimental furnace. The next day I was able to see this furnace on my visit to the site itself.
(Trene's Experimental Gas Jet Furnace at the Ribe Viking Centre)

The initial concept behind Trene's set up was to trap and utilize the hot gasses from the charcoal fire, rather than work inside the furnace itself. The combustion gasses escaped from small vent in the top of the roughly cylindrical clay structure. In this way the manipulation of the glass was physically more like working with a modern torch flame.
Although not designed specifically for this method, those working with Neil's 'oven' design, more and more were found to manipulate the glass in the 'chimney' holes in the top of the structure. (See Video Segment)
(Mark 2 'Teapot' Gas Jet Furnace in use)

To that end, a first attempt at a building a specifically gas jet furnace was undertaken at the July Trillium War demonstration. This specific layout was quickly found to be quite unsuccessful, as the upper gas jet never produced enough heat to do much more than slump the glass rods used as a raw material.
Taking a close look at Neil's first rendition of the system, I thought I could apply some of my experience with charcoal fired forges to the design.
(Theoretical Gas Jet Bead Furnace - scale 1:2)

One of the biggest problems with the Mark 2 layout was found to be the sloppy fit between the large side loading port and the inserted annealing cup. The large gaps here were found to be venting as much (if not more) of the hot combustion gasses as the top working vent. One of the largest changes in the new furnace is that instead of a side loading port for charcoal, it is designed in two sections so that the entire top can be lifted off to add fuel. The top rim of the lower section is beveled, so that the upper body would quickly slide back to the correct location when it was replaced after loading.
A second major modification, is the change in the shape of the lower section of the furnace. Rather than an elongated D cross section, this proposed furnace is more of an 0 shape. The bellows tube is placed so that the distance below the furnace is roughly equal to the side to side measurement. This will allow the air blast to completely penetrate the charcoal mass, as well as cause any piled fuel to move down and into the air blast as it is consumed. A small hole into the interior, located roughly two inches above the bellows tube opening, would allow the operator to directly observe when the top of the charcoal had dropped to a level where addition was necessary.
In this arrangement, the bead maker sits directly opposite the bellows. There would be a small port with replaceable cover at the middle level of the side wall, allowing working of tesseri inside the furnace itself. (This using the method discovered at the Trillium demo, detailed in an earlier posting.)
Most of the detailed glass work is intended to take place in a second small chamber placed at the top of the furnace, directly over the exhaust port for the combustion gasses. This would have a single small opening, placed on the side closest to the glass worker. The very top of the furnace would have a shallow cup, intended to be filled with ashes to provide an annealing area headed from below.

With luck a first prototype of this modified furnace - MK 3 - will be built and tested later in July.

(Darrell)

Labels:

Monday, July 6, 2009

Glass Bead Making Furnace


Neil / Ragnar working with the mark five experimental bead furnace.
Trillium War, Whitby ON - July 4, 2009

This furnace is based on the base plate remains found at Ribe, Denmark, dating from the early Viking Age. There was no superstructure preserved, so a number of top designs have been experimented with. The combination of top vent and side port with cover appears to be the most flexible. Most likely a mark six design will be built, as new knowledge is gained every time a serious work session is undertaken.

One key techinque was stumbled upon (pretty much by accident).
An ongoing puzzle has been how the Norse worked with glass tiles (tesseri) as their source of raw glass:

This is a direct method (rather than involving a melting pot or creation of glass rods as intermediate step).
- work is done inside the furnace through a side port
- glass tiles placed on flat surfaced piece of charcoal (which can be used two or three times)
- wait till glass tile heats till edges just start to slump
- make sure your mandrel is well heated (to orange)
- touch mandrel to one corner of the tile to affix small corner of glass
- raise and twirl mandrel. This effectively pulls a stringer shaped finger of glass off the tile.
- now the process is like working with a rod, thickness of the stringer is controlled mainly by height the mandrel is lifted above the tile.
- This appears to reduce the amount of ash contamination, plus produce a correctly shaped bead (rather than the irregular shape produced by grabbing the entire tile at once.

Check the main DARC web site for more information on Neil's ongoing research and experimentation into VA glass beads and their production.

(Darrell)

Labels:

Sunday, July 5, 2009

Another glass bead melt

At a local SCA event this weekend we set up two bead furnaces - the standard oval and one of the newer teapot style. We spent the day Saturday working with new people giving them a chance to try making a bead in the oval, while squeezing in a little time to try a couple of things ourselves.

Quick summary
- two annealing areas - between the chimneys & the crucible in the side. The pot on top reached a temperature of 695C (1283F) while the crucible reached 598C (1108F). Both of these temperatures are well above the 900F we need for annealing. In fact we had a problem with one bead (it picked up a lot of the vermiculite we had in the pot) this might have happened due to the glass getting too hot. This needs to be retested with ash as the insulator rather than the modern vermiculite.

- Much better success rate - 25 beads survived, 13 broke. Given the number of first time bead makers this is pretty good. It will be interesting to see what happens when we can do a run with just experienced bead makers for a day. I'd like to see a higher overall number of beads and a higher success rate.

- Maintaining a useful temperature is HARD in these furnaces. A charcoal load gives time to make a single bead at each side. Tiny changes in the direction of air inflow can make big changes. We need a method of slowing adding charcoal to try to keep a more consistent temperature rather than adding a bunch waiting for it to heat up, the making a bead and repeating. We also need to track the stability of the temperatures in the annealing area rather than just the single point reading I snuck in.

- The teapot furnace had even more difficulties. The fuel load was small enough, and the airflow directed enough that the fuel in the middle of the base burned off but the fuel around the outside wouldn't move in. This implies a cone shaped bottom to help the fuel flow better. In addition the crucible in the spout was not a great fit meaning more heat escaped around it than came out the chimney when it was intended.

- In the oval furnace the smaller chimneys meant working in the chimney was more effective than working in the ports - at least when working with rods. The tesserae require a different approach.

- Darrell had some real luck working with tesserae creating 3 good sized beads that survived. We think we have a solid working method for this, now we just need to test it further.

- I am still troubled by the relationship between the archaeological remains and the remains after we are done. The Ribe pads seem to be flat pieces, finished (not with remains of walls attached to the pad. Yet even when we don't deliberately join the base to the walls we when we break down the furnace we still don't reproduce the archaeological remains. There are clearly some construction details remaining to work out.

Neil

Labels:

      Updated: 4 Dec, 2007
Text © Dark Ages Recreation Company, 2007
Photographs © Individual artists
Copyright details
Contact us