sml logo Dark Ages Re-Creation Company sml logo

Monday, November 16, 2009

Vinland 3 on YouTube

Re-Creating the iron smelt by the Norse in Vinland, circa 1000 AD. Members of the Dark Ages Re-Creation Company (http://www.darkcompany.ca) undertake their third smelt in this specific series on November 7, 2009. The result was a 2.9 kg bloom produced from 18 kg of bog iron ore analog. This smelt used all human powered air, supplied via a Norse style double bag bellows.


Footage shot by D. Markewitz & K. Thompson

Iron Masters : Darrell Markewitz & Ken Cook
Charcoal : Sam Fallezone
Ore : Neil Peterson
Records : Steve Strang
Bellows operators : Dave Cox, Marcus Burnham, Sam, Ken, Darrell
Consolidation: Ken, Darrell, Dave, Sam

(duplicates post on Hammered Out Bits)

Labels: , ,

Wednesday, October 14, 2009

Vinland 2 Smelt - On YouTube


This short sequence shows the mechanical piston bellows in operation (dubbed the 'FrankenBellows'). A sequence about 3/4 the way through the smelt, showing the effect of cracking from the clay slab construction used. Last is the extraction and first consolidation sequence, featuring Ken, Neil and Sam.

Cross posted from 'Hammered Out Bits'
Darrell

Labels: , ,

Wednesday, July 15, 2009

Three New Activity Pages

We will likely still add some more pictures and links there are three new pages up on the site.

http://www.darkcompany.ca/beads/bead0509/
- a bead melt with two furnaces. Not a very successful day but a chance to try a new furnace design.
http://www.darkcompany.ca/beads/bead0709/
- another bead melt with two furnaces. Much more successful with training for many new bead makers.

http://www.darkcompany.ca/iron0509/
- our most recent iron smelt - the first try at the reproduction of the smelter from L'anse aux Meadows.

Neil

Labels: ,

Monday, June 1, 2009

Vinland Iron Smelt (on YouTube)


Based on the archaeology of L'Anse aux Meadows, the Vinland of the Sagas,an experiment by members of the Dark Ages Re-creation Company. This iron smelt uses an analog for the bog ore used in 1000 AD by the Norse to produce a 4 kg bloom.


(see yesterdays 'Hammered Out Bits' blog posting for more details)

Darrell

Labels: ,

Tuesday, May 5, 2009

L'Anse aux Meadows Smelt - Working Area

(This post is a mirror from Darrell's 'Hammered Out Bits' blog)

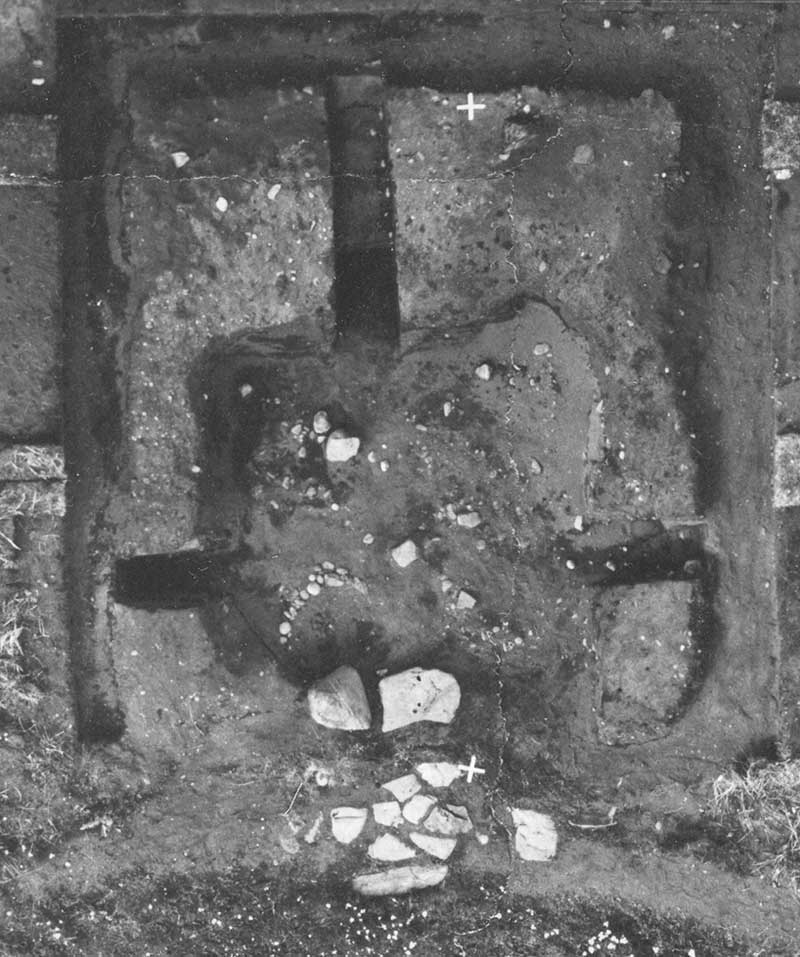
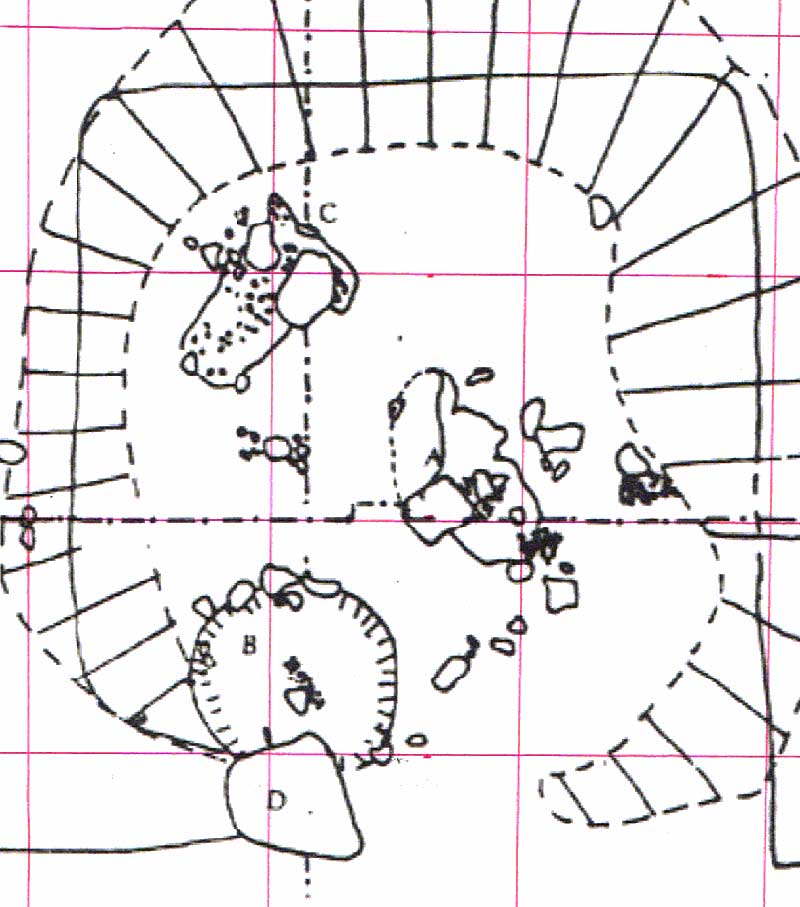
One of the specific challenges in the recreation smelt for L'Anse aux Meadows NHSC is working inside the same physical set up that is suggested by the archaeology:


Overhead photo from 1974 excavation

Scaled drawing (1 meter grid)

The photograph and illustration above were kindly provided to me by Dr. Birgitta Wallace.

In the photo, the arrangement of flat stones seen in the lower centre are not part of the artifact set. Those stones were placed to protect the archaeological layer by Ingstad & Stine at the close of their original excavations in the 1970's. The largest stone in that area (lower grouping, but upper left) is in fact part of the artifacts.
The illustration to the right has been slightly enlarged (to match my workspace drawing below) and I have added the 1 metre grid to it.


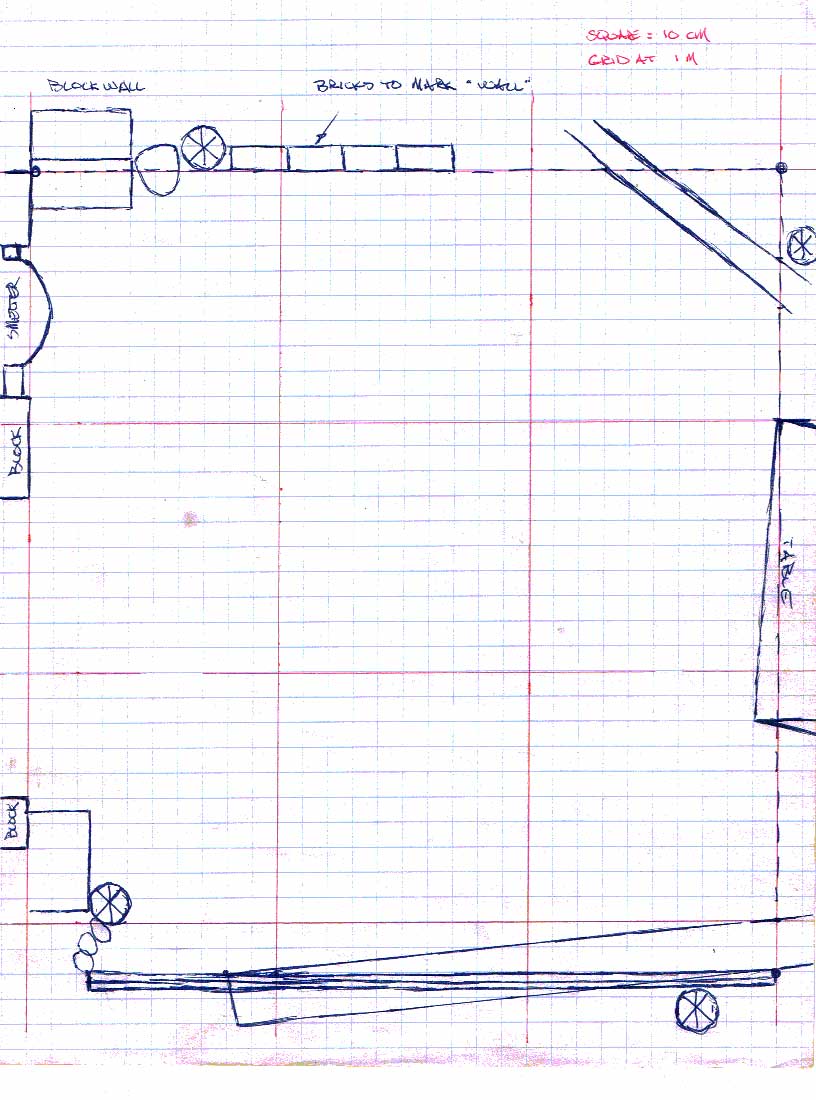
This is a drawing of the current smelt working area here at Wareham, with a scale matching the archaeological drawing above.

You can see that the overall size of building J (what is described as 'the furnace hut' or 'the smithy' in the original reports) is roughly 3 x 3 metres. The exact measurements in Dr Wallace's 1974 report is a width of 290 cm and length of 320 cm. As you can see, we can closely match those measurements under the overhead of our current work area.

In the next posting, I will start talking about just what the archaeology may (or may NOT) tell us about what happened at Vinland about 1000 AD.

Labels:

Saturday, December 27, 2008

DARC Fall Smelt on YouTube

Tuesday, December 16, 2008

Last of 2008 Iron Data ready

Because Neil is currently working to upgrade the DARC Iron Smelting pages with the 2008 series, I thought I should get all the experimental data formated and posted. The missing information was on the April 13 test of DARC Dirt 1

http://www.warehamforge.ca/ironsmelting/April08/4-13-08Data.html

Darrell

Labels:

Monday, November 10, 2008

DARC Fall Smelt - Draft Report

A fast overview report - duplicate from 'Hammered Out Bits'

On Saturday November 8, a small band gathered for the normal Fall DARC smelt. This was number four in the main sequence of our Icelandic / Hals series.
Building on the work from the October (Thanksgiving) smelt, this experiment focused primarily on the use of the bellows plate and blow hole combination. Ken Cook served as Smelt Master, with Neil Peterson assisting. (And Darrell constantly sticking his nose in to keep things on track.)
About 3 1/2 hours into the main sequence, the smelter starts to self tap. You can see the arrangment for the air system, handing from supports.

Total Fuel : 48 kg
Total Time : 5 hours (plus 2:40 preheat)
Total Ore : 23 kg (mixed poor Virginia Rock / Hematite grit
Total Bloom : 4.25 kg
Total Yield : 18 %

Average Burn Cycle : 12 minutes per standard 2 kg bucket

The bloom was less consolidated on extration than what is seen from a smelter with an insert tuyere - more of a 'lumpy' texture. It also was positioned a bit futher back from the air inlet than expected, and had a marked crescent shape.

As with the Thanksgiving smelt (which also used the plate / hole) there was a choke point at roughly 2 1/2 hours into the ore charging / about 7 kg. The developing slag bowl threatened to drown the air intake. On this attempt we were better able to control this, and the smelter would settle down once the slag evolved from the early green silica type to the later black iron rich type.

Darrell

Labels:

Sunday, October 5, 2008

Thanksgiving at Hals in Wareham (1)

(this is a duplicate from 'Hammered Out Bits'
This is a fairly long posting, expanded from a recent set of e-mails.

There has been some discussion (Kevin Smith / Ken Cook / Neil Peterson and myself) of the framework for the Thanksgiving smelt. For those keenly interested, this will be at Wareham Sunday October 12.

As regular readers may remember, the DARC smelt team is working towards a full reconstruction based on the evidence from the Hals site in Iceland. The excavation work is being done by Kevin Smith (reference : 'Ore Fire, Hammer Sickle : Iron Production in Viking Age and Early Medieval Iceland') An earlier discussion - 'Towards an Icelandic Smelter'.
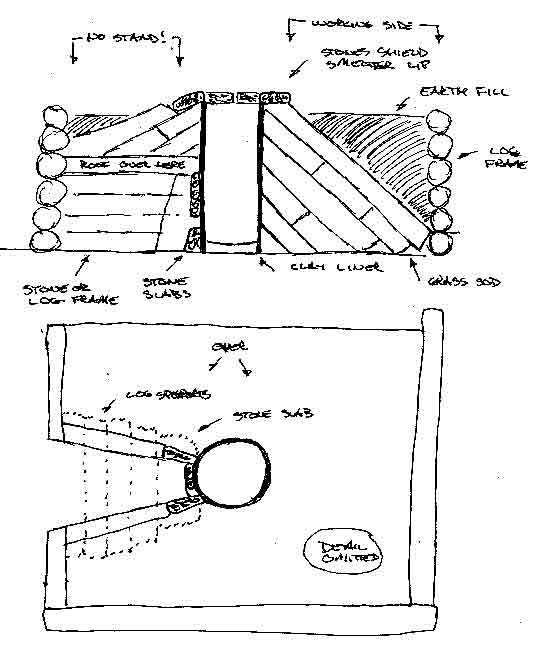
Possible layout for the furnaces at Hals based on remains.

There are a number of individual elements that go towards the full reconstruction:

Sod cone in a log frame construction
Hand powered bellows
Use of thin clay / marl liner on interior
Working down a narrow slot
Tuere above tap arch set up
Stone slab front construction (?)
Use of 'bellows plate' (?)
Use of primary bog ore material


The sod construction represents a major logistics challenge at this point. We need a skid of grass sod (hopefully donated). Time is too tight to set this up for this Thanksgiving. I also think there are a number of other pieces to work up before we go that full construction. We can certainly use an earth banked design which will allow us to test a number of the other elements.

Hand powered bellows is almost a party trick at this point. A full test is more about labour organization than air delivery effect on the smelt. We should get some solid delivery numbers on the new test bellows. This can be done as a simple working test as was done last June, using multiple operators and an averaging aneomometer. Frankly, I'm sure that new bellows unit will give us the required volumes, so this is largely a work dynamic more than technical issue. (see earlier posts)

Use of the thin liner should represent a major test on its own. The simple way (see below) would be to dig a cylinder into our pond earth bank for the smelter, then line the dirt with the thin clay. We will have to substitute straight ball clay for marl - as we just can't GET any marl / 'glacial blue clay). I did read in Pleiner (someplace?) about furnaces that were simple cylinderical holes cut into the ground near the edge of a natural bank. Then lined with a thin) layer of clay as fire proofing. (I think these were English / Anglo Saxon??) The evidence from Hals does not appear to give us either the thickness, or mixture of this suspected clay liner. Kevin Smith has suggested 2 - 5 cm. I suspect you would want to use the horse manure cobb here.

The work dynamic of the Icelandic is the easiest thing to work on right now. Ken and I talked it over, and we think we can 'fake' this out by digging a key hole into the side of the pond bank (more details below). This would let us use the upper ground level as if it was the top of the sod construction., blocking out the 2 metre square working platform. Now this would require us to undertake all the physical adjustments to the smelt bowl working down a roughly 1 m long slot. I think we should also fake the position of a man powered bellows by placing a plywood cut out, but at this point still use the blower air system. This should definitely be one of those 'rake the sand' experiments to look at work and debris patterns.

The major shift for us is the placement of the tuyere directly above a small tap arch. Michael Nissen from Ribe uses that rough layout all the time on his smelters. I'm not really expecting any big problem here. (see above)

Now, we did mess with the stone slab construction for the Thanksgiving and Fall smelts of 2007. The first of these we did try to use the 'blow tube' style tuyere (tuyere set back from blast hole), but with poor results. The use of a stone front on the smelter (or entire stone construction) has been tested to success. My own interpretation of the layout from Hals leads me to believe you would want to(ideally) construct the smelter with a stone slab set above a clay bellows plate. Our own tests certainly suggest that any stone used in this fashion will bear significant and distinctive patterns. Kevin Smith has reported "We do have a small number of spalls with slag that could make sense from a similar use.", from a discussion on our results from the October 2007 smelts.

What about the use of a separate clay bellows plate? This represents both an archaeological question at its core. Again, there appears to be no specific artifact evidence, but this is balanced against the relatively fragile nature of these plates. Does the evidence indicate STONE used as the front section of the smelter around the tuyere? . What about the use of a separate clay cobb 'plate'? A number of smelts (mainly Nissen) have shown that a roughly 15 x 20 cm by 2 cm thick plate of dry horse manure mixed with clay works extremely well.

The third piece of this method is the set up with the tuyere actually sitting proud of the smelter wall. I did use the combination of bellows plate (thin plate around tuyere entry) with blow tube set up at Smeltfest 08 for two smelts with good results. Also watched this done three times in Denmark. So taken together, I'm pretty sure we can get this to work.

We do need to tweak the mix on the DARC Dirt. Due to bad communications (and poorer math!) the actual iron content of the first round of test materials was really on the low end. It did match the St Lunaire samples, but ideally I'd rather bump up the iron content to something richer and more likely to give higher end yields.
Given time and supplies, it might make more sense to use a richer ore body for this next experiment. We also should try to match the ore content from Hals if at all possible.

SO

Trying to keep with the wisdom of not changing 5 things at once (!!) I propose the following for the Thanksgiving smelt:

1) Overall set up is a totally earth surrounded smelter at the end of a slot - with the layout similar to those at Hals (see below)
2) Use a thick walled clay cobb furnace structure.
3) Set up the work area with a fresh sand base.
4) Use a known pure ore (the taconite likely)
5) Fake out the location of the hand bellows, but use the electric blower for air

A) Use either stone slab or bellows plate construction
B) Use blow tube arrangement for the tuyere (which can quickly be modified to our normal insert tuyere if required.

This suggests to me one minor (number 1) plus two major changes (A / B). I have worked both A / B, and 1 is more a modified work dynamic than an actual major change.

The set up of the furnace with only a small tap arch down a slot certainly leads to a top extraction. To that end we should aim for a 3 - 5 kg bloom.

(More on Construction in the next Post)

Labels: ,

Thursday, July 3, 2008

the Aristotle Furnace Demonstration

(Duplicate of post seen on 'Hammered Out Bits' )
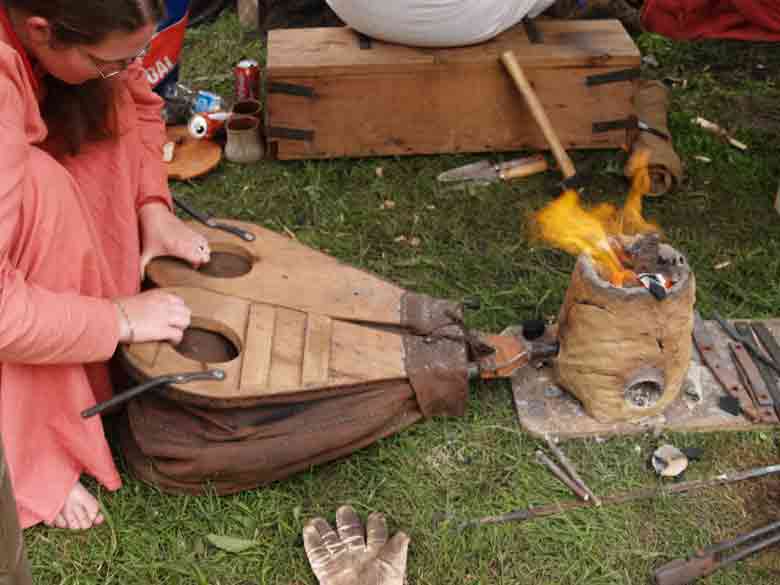
At the SCA event Trillium Wars over June 28-29, the 'Aristotle Furnace' was demonstrated by members of DARC.
The furnace design is the work of Skip Williams, who researched the concept and had built a number of working prototypes to establish a method. I was taught the basics of its construction and operation at Smeltfest 08 back in March. In earlier posts there is a fuller description of the design and workings of this small furnace. It functions by melting scrap iron into a fresh 'puck' of mid to high carbon steel over a relatively short operating cycle.

The two images here are the only ones captured from the recent demonstration. Both images are by Karen Peterson (of course I was engrossed in actually running the furnace.) My primary assistant for the entire process was V. Meghan Roberts, who both helped with the messy work of building the furnace and breaking charcoal, but also proved to be a good bellows operator.
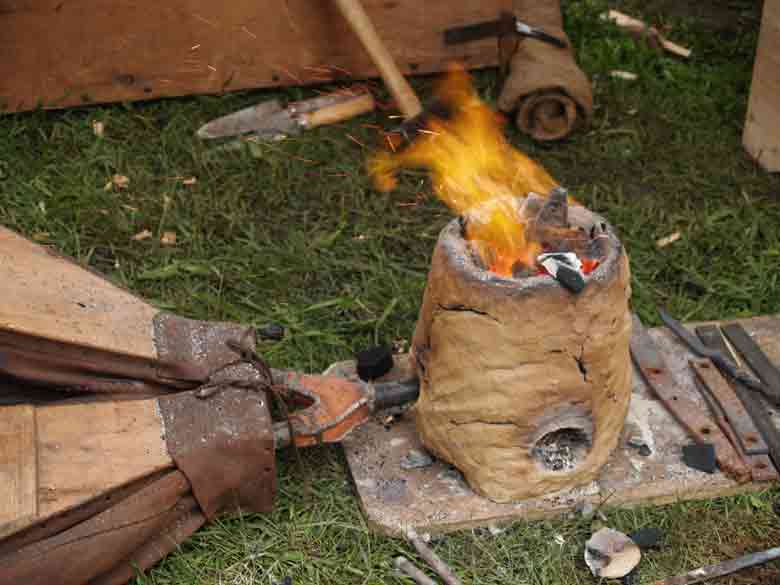
The first is a close up of the furnace itself in action. The body is made up of a mix of horse manure and powdered clay. I had the manure from my farm neighbour, and tried to gather older and drier material. About a half of a standard five gallon pail was first shredded by hand. (Fresh manure does not work up as well, being too moist to easily mix with the clay). To this was added about an equal volume of dry powdered ball clay (from our local pottery supply). Water was then slowly included, to create a mix roughly the consistency of bread dough. Each double hand full was worked to an even texture before it was applied to the furnace. Roughly a half bag of clay was required , a rough cost of about $10 (we had some unused cobb material left over).

The furnace was roughly 15 cm on the internal diameter, standing about 30 cm tall. (This was maybe a bit on the short side.) The base was a slab about 3 - 4 cm thick, the walls roughly the same. Initially there was a air hole cut into the side to fit the bellows tube. This was located about 5 cm up from the floor of the interior, and about 1 cm in diameter into the furnace. The outer side of this hole was roughly conical, to hold the 2 cm diameter bellows tube.

The furnace was constructed on the Saturday, then left overnight to allow the clay to stabilize and partially dry. (We had originally intended to fire on Saturday as well, but there was a lot of activity in the small work space, so we waited to reduce the confusion.)
At the start of the pre-heat phase on Sunday, it quickly became apparent that the single air port would only allow for combustion with the use of forced air from the bellows. As it is always important to provide a gentle heating until all the water is baked out of the clay structure, a second hole was cut into the base. This hole had tapered sides, about 5 cm in diameter on the inside surface. Taking a lesson from Jake Keen, there were two angled holes made to hold a pair of twig sticks. This allowed for manipulation of the plug later when it was hot. The shape caused the plug to be christened 'the pig nose'. The larger air intake allowed the wood splints of the pre-heat to burn correctly. This gentle heating would continue for about an hour and a half. Pre-heat was judged to be complete when there was no longer any white steam visible off the furnace's sides.This shows the furnace and bellows combination, along with one of our many volunteer bellows operators. The bellows used is a Viking Age blacksmith's bellows, based closely on the two artifact sources (see earlier posts for a long discussion of this equipment). In total we ran the furnace through three cycles, with quite differing results from each. The primary reason for this inconsistency was the variation in air volumes created by the efforts of the various operators. Almost all of them had no experience with hand bellows, much less this specific Norse type. Not too surprisingly, those who had previous experience with the bellows type produced the most suitable air deliveries for the process at hand.

For the first cycle, the metal used was a short length (about 25 cm) of standard 1/2 inch round mild steel rod. The air delivery was by far the most suitable and consistent, as I undertook the bellows operation for this cycle. (I certainly was the only one who had ever seen the furnace in operation, plus had considerably more experience working hand powered bellows.) Mehgan also assisted on the bellows, but had paid close attention and pretty much duplicated my method and rates. The fuel was also smaller particles, as most of it had been gathered from what remained of the forging operation from earlier in the day. Most of the pieces were still ignited, lightly ash coated, and roughly 'walnut' sized. The end product of this cycle was the desired lump of higher carbon metal 'bloom', in this case with a short stub of the parent rod (about 3 cm worth) still attached.
Some problems with equipment placement caused a mad scramble getting this piece from the furnace to the anvil, so by the time the hammer was striking the metal had dropped to the low oranges. Even still the material proved to be forgable metal, at a guess a mid carbon steel (no grinder was available for spark testing).

For the second cycle, the metal used was a piece about 30 cm long of recycled wagon part, flat bar about 1/4 x 1 inch stock. The material had earlier been tested an appeared to be a lower carbon steel (not actual wrought iron) and was heavily surface pitted. The bellows operation for this sequence was far less consistent, with a lower air volume on average and thus both lower temperatures and longer consumption rate of fuel. This created both a slower conversion of the bar and also suggested more possible soak time to absorb carbon from the interior. In actual fact the end result proved to be a high carbon cast iron. The puck of material produced was not forgable, fragmenting under the hammer.

On the last cycle, the metal used was a piece of 3/8 square mild steel bar, again about 30 cm long, recovered from a damaged fire tool. A number of people took turns on the bellows, most significantly Sam, who had his blacksmithing experience from his Ango-Saxon forge to guide him. The air rates fluctuated most widely over this cycle. This again could be seen in the results. The metal fragmented under the hammer, with the bottom half splitting off clearly as brittle cast iron. The upper portion of the puck appeared to be useable metal, but was certainly tougher to shape that the metal from cycle one. On a guess this material should test out to a higher carbon tool steel.

Although the furnace did come through its repeated uses in reasonably good shape, it did not survive being dropped out of the truck while being unloaded the next day.

The method of manufacturing the furnace was well demonstrated, and the horse manure / clay mix seems idea for the construction. The general principle of this small steel furnace was again proven. It remains clear that bellows operation is the largest variable, with experienced operators being critical to the function of the furnace. The great advantages of this furnace, ease of construction and speed of a single use cycle was again demonstrated. More work needs to be done to fine tool the correct sequence, which repeated uses to accumulate experience will provide.

Labels: , ,

Monday, June 16, 2008

DARC Spring Smelt

(duplicate of entry on 'Hammered Out Bits')

This is a very fast report on the DARC Spring Smelt on June 14.

Attendance was lower for this one. The core team was:
Darrell Markewitz / Ken Cook
Notes, Charcoal (and other messy jobs) - Anne Graham
Strikers - Neil Peterson / Richard Schwitzer
Smelter construction - Sam Falzone / Richard

As reported earlier, the intent of this smelt was a full scale test of Gus Gissing's DARC Dirt One - primary bog ore analog. A new standard 'Norse Short Shaft' furnace was constructed. It was decided to make two alterations from the earlier tests:
The analog had shown a tendancy to produce a crumbly high carbon bloom, a type which often proves difficult to forge down to a working bar. For that reason is was decided to increase the average particle size. The dried plates were lightly hammered through a 1 inch wire grid, then screened through a 3/16 inch mesh to remove the fines. This resulted in a slightly larger size than the last two tests.
Second, it was decided to charge very heavily right from the start. Ore was added at one to one against charcoal (2 kg ore with 2 kg charcoal).

We used 20 kg of the bog analog and got a very nice small bloom at 1.8 kg.

Those numbers need a bit of massaging to compare to our past work:

The ore number is actually higher than reality. That's because the analog is mixed with water, and the paste was air dried. There will be some content of water still remaining. I have to take a measured sample and put it into the gas forge on a pan to get a 'dry weight' that would relate it back to the roasted rock ores we have been using. On the last test, the analog was also air dried, and after baking the water content removed was about 12%.

The bloom weight was taken at a different stage in the process than what we normally use to take that measurement. Normally we pull the bloom and work over the surface for one heat to knock off the real 'frobby' bits. This is when the production weight is recorded. For this bloom, which was pretty 'juicy' we had put it back into the smelter with more charcoal (using the smelter like a big forge). We ran through two more hammer cycles, compacting it down to a very rough brick, then one more to slice it in half. So there would have been a bit lower comparative weight to others.

Taken together, this does put our yield down into the 10 - 15 % range - not into the 25 - 35 % range we have come to expect.

We were running this smelt with a bit less air than normal. By the anemometer, we started in the range of 450 litres per minute, eventually working up to closer to 750 LpM. Our consumption of charcoal was averaging about 10 minutes for a standard 2 kg bucket.

We are going to have real good slag volume numbers on this one (to send to Arne Espelund).
First the smelter itself came through the smelt with almost no internal damage at all. There was some erosion just BELOW the tuyere. The slag bath started out sitting a bit higher than normal. We had to poke through the bottom of the bowl as it first formed to drain it a bit lower to keep the tuyere clear. I think that might be the reason. There was no noticeable effect to the smelter wall above the tuyere at the usual hot zone. The inserted ceramic tuyere was hardly effected at all.
We were just getting everything ready into the very end of the burn down phase when the furnace decided to self tap. It was like the waters breaking in a pregnancy. Pretty much all the liquid slag ran out all at once. This was the dark olive green / black real runny stuff. I got concerned that this would expose the top of the bloom to the air blast, so quickly decided on a bottom extraction and reduced the air and got working to yank it all out. There was a very clear volume of slag that formed the bowl itself that was pulled clear. When we grabbed the bloom, there was a third type of slag adhered to the outside of it as well. The analogy of the chocolate covered cherry is perfect here. I will be able to pretty much separate out the three types, and gather all of the slag for weight later.

The bloom feels like nice iron (I've not photographed or spark tested it yet). It is a bit on the crumbly side, more larger blobs hanging together than the nice dense rock blooms you always achieve. Better cohesion than the 'brown sugar' effect you saw at the Smeltfest test of the ore analog. I know its going to be easy to forge this one to bar, the initial consolidation went very smooth, no slitting or fracturing at all.

I'm very pleased with the overall results. The smelter came through in almost perfect condition. We were able to predict and modify the sequence to get around the tenancy of the ore analog to absorb too much carbon and not fully sinter together. Neil and Ken worked as an excellent and smoothly functioning team.

I have to find my actual notes from the day, process the images and get a field report together.

Darrell

Labels:

Wednesday, April 9, 2008

Smelting Materials on Hand (Spring 2008)

This is a list of the materials stockpiled. The list may prove a bit confusing, as some of the items were paid for specifically by the Wareham Forge (WF) and are held under its recorded inventory. (In practice, those materials are also used for the general run of experiments, but are also dedicated for use in paid demonstrations and student courses.)

Sorry about the mixed units

Ore Bodies:

Total number of 40 - 50 lb smelt events indicated

Hematite Grit (WF) - 7 x 90 lb bags plus about 40 lbs loose = 670 lbs (15 smelts)
Taconite Pellets (WF) - about 40 lbs loose (1 smelt)
Spanish Red - about 15 lbs loose
Virgina Geothite (poor quality!) - about 125 lbs total (3 smelts)
about 20 lbs has been crushed to size
Jamestown Geothite (WF)- about 200 lbs as rock (4 - 5 smelts)

DARC Dirt 1 - about 50 lbs (1 smelt / April 13)

Mixed Gromps - estimate about 100 lbs from past smelts

Silica Sand - for DARC Dirt, about 35 lbs

Charcoal:

Total number of 50 - 60 kg smelt events indicted

Royal Oak - 10 x 20 lb bags = 200 lbs (1 full, 1 partial)
Black Diamond (WF) - (damp) 2 x 10 kg + 4 x 15 kg = 80 kg (1 full, 1 partial)
Black Diamond (WF) - (dry) 5 x 10 kg = 50 kg (1 full / April 13)
there is also a smaller quantity in partial bags (maybe 5 kg)

Charcoal Fines (WF) - total about 25 kg

Smelter Construction:

Ceramic tubes (tuyeres) - total 7 (1 for April 13)

Ball Clay - 2 x 50 lbs (1 full smelter)
Ball Clay (WF) - 2 x 50 lbs (1 for April 13)
Plus two partial bags (used for April 13)

'Cooperstown Brown' - dried & rough, about 50 lbs
Slab clay - boxed and partial dried, about 35 kg

Misc: (standard 5 gallon pails)

Ash / Sand packing - about 4 pails
Course Sand packing - about 3 pails
Wood ash - about 5 pails
Sawdust - about 6 pails
Straw - about 3/4 bail


GOING INTO THE SEASON

Our primary shortage is once again charcoal. Supplies on hand would just get us through perhaps a total of two smaller (20 - 25 kg) smelts. (Note that most of the WF materials are allocated to the April 13 smelt and the possible June 7/8 course.)

As with past years, ore remains a potential problem. The supply of Jamestown Geothite is of proven high quality, and is enough to provide a stable type for several inter-related experiments.

Darrell

Labels:

Thursday, March 13, 2008

Iron Smelt Movie Test

(duplicate of a post on 'Hammered Out Bits')
I was preparing some clips as part of a proposal to demonstrate at Quad State Roundup in September. One thing I generated is a small sized movie (at 1.9 MB) that could be used on the Wareham Forge / Iron Smelting web site.

The test clip was processed into a Quick Time file (.mov) via iMovie on a Mac. It would be interesting to see if various of my readers here can actually view the movie file on their machines.

The clip is part of the record made during the 'Icelandic ONE' smelt undertaken here at Wareham in early October (Thanksgiving weekend) in 2007,

to view the clip - use the link

http://www.warehamforge.ca/ironsmelting/icelandicA/IcelandicONE.mov


for more background on that specific smelt, go to

http://www.warehamforge.ca/ironsmelting/icelandicA/


Darrell

Labels:

Monday, March 10, 2008

DARC DIRT ONE - draft notes

A Bog Iron Ore Analog:
(also cross posted to Hammered Out Bits)

A post this morning on Early Iron has lead me to jump the gun a wee bit, as I am working up a full report on this work for later in the month.

The team here (mainly Gus Gissing) have been working towards creating a 'bog iron ore analog'. One continual problem we have endured is wide variation in ore sources and qualities. Nature of the ore in turn effects the fine details of smelter design, and determines the characteristics of the blooms produced. With continual changes in ore type, it has been quite difficult to establish a predictable production from individual smelts.
Based on Gus's earlier work on 'Mars soil analogs', we took a look at what iron oxides were commercially available. Pottery supply companies sell a number of iron oxides as red pigments for glazes. Under the name 'Spanish Red' the material is is listed at 96.5 % Fe2O3 and 2 % silica. (I'm trying to trace down what the balance is). It is also available in a finer version through places that mix paints or sell base colours for printers inks, but is considerably more expensive in that form. It is also used to colour concrete, but I have not been able to track down some place that sells it in the kind of sizes we require. I expect the concrete pigments might be even cheaper.

The 'Spanish Red' is the cheapest of the straight Fe2O3 powders. It comes in 25 kg (50 lb) bags for about $50 CDN. The stuff we can get here in Ontario comes in a grit that is a bit finer than flour. As other iron experimenters have found, straight from the bag it is just too fine to work inside the kind of air blast our various smelter designs are producing. To get around that problem we are creating an artificial 'bog iron ore analog' (christened DARC DIRT ONE ).

The starting point is 80% by weight of the Fe2O3. We also were concerned that straight out of the bag it might prove too 'dry', so to get some extra slag production we are adding 10 % by weight of fine white silica sand. This is sold around here at Home Depot as 'decorator sand'. I suspect a plain beach sand would work fine too. The last component is 10% of plain white flour. This is basically inert, and serves as a binder. The powders are mixed by shaking in a large container with a (tight!) lid, then enough water is added to make a paste. The paste is then spread out to dry, our suggestion is in a layer about 1 /4 inch / 5 mm thick. The dry paste is then broken up with your hands to pieces roughly 'pea to peanut'. For the small batch tests I just spread the paste on a cookie sheet and set it under the wood stove for a couple of days.
From the looks of our test batches (one lb / 500 gm scale) I think you will want to run the broken material over a fine screen, say a window bug screen on a frame. Any of the dust can just be added into the next batch. The larger pieces are ready for your smelt.

This mix compares chemically and mechanically pretty closely to the samples of natural bog ore I dug in northern Newfoundland. (I say this knowing quite well that 'bog ore' can look a lot different from region to region!) At this point that assessment is based on the mark one eye ball, we have not done any detailed testing of the material we have come up with yet. One potentially huge advantage to the use of dry oxide powders exists for those involved in detailed archaeological reconstructions. Other small amounts of oxide powders (many also available at pottery supply) can be made to the base mix to simulate the specific ore contents from a given geographical location.

Gus (through his business Harder Gissing Machining) has donated enough of the oxide for two production batches. I picked up the the materials over the weekend. Todays work is to mix up a full production batch of DARC Dirt 1 in preparation for a full smelting test. As we are completely buried here under snow, with temperatures below freezing, I will not be able to just spread the past on a plastic sheet and let it air dry as I would hope to. I bought a bunch of thin aluminum foil 'oven liner' pans and will spread the paste on those and stack them in the kitchen oven to dry. Figure (hope!) a couple of hours at 200 F will do the trick. My aim is to prepare 25 kg (50 lbs) of the analog to use in a smelt next week with Skip wen I am down at Smeltfest at Lee's place in Virgina.

So expect a full smelt report on the use of the analog later in the month.

The post on Early Iron had mentioned using ground magnetite. This is sold at the pottery supply as 'black iron oxide'. The chemical form of this is Fe3O4. It is also a very fine power, and is actually half the cost of the red oxide. We intend to also make a full scale test of this source material, using a similar mix to paste, dry and crush. The chemistry of the black oxide is a bit different, which may or may not influence a smelt.

Using the Spanish Red, the cost per smelt (a bit over 25 kg / 50 lb 'ore') will work out to about $55 CDN - roughly $1 per pound. The huge advantage is that this material is easily available and will be standard smelt to smelt.

Labels:

Monday, January 28, 2008

2008 - Directions for AIR

This is a shortened version of an ongoing series of posts over on the Hammered out Bits Blog:

The core members of the DARC smelt team (Neil, Kevin, Dave and Ken) were up over the past weekend. We discussed what we are learning, what we have done, and what direction this year's campaign at the smelter should take.
The main thrust will be work towards the reconstruction of the Icelandic grass sod smelter. At present we have two pieces of technical work to refine. The first (not dealt with there) is the creation of a workable bog ore analog. The second is to finally get an effective bellows design.

2008 year experiments


'Test Bed' Double / Twin bellows for iron smelting

1) Neil has ordered a copy of the small blacksmith's bellows for his glass bead furnace project. This will be made up using the current physical measurements, but with two important changes.
- First the bag will be cut with only two leather lames - giving a maximum loft in use of 30 cm. This will reduce the folding of what is just unused leather surface. The wooden frame will be made up, and then a fast test bag will be made up out of taped plastic. This should allow for a fast test series to be made to measure the air volume with the shorter bag.
- If this test proves effective, then the bags will be made up using a lighter (likely deer skin) leather than has been used on previous versions.
- The centre seam will be fitted with a more rigid metal hoop than has been used in the past (at least 3/16, if not 1/4 inch round steel rod).
Taken together, this new unit should allow us to record more accurate numbers for the possible use of the historic patterned bellows in smelting.

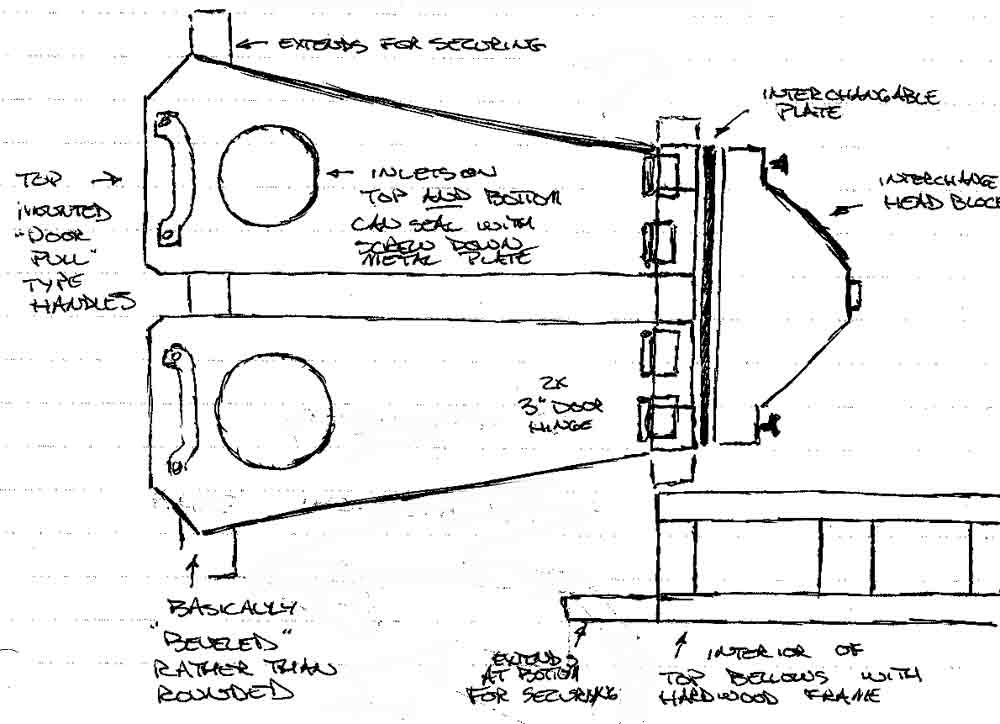
2) A second 'test bed' bellows will be made up (as seen in the illustration above).
- Measurements for this bellows will be determined by taking a theoretical model which is able to produce roughly 1500 LpM. The desired working air volume is actually 1000 LpM. Numbers and images from Jens suggests a true working efficiency of about 2/3 theoretical is likely (assuming good design). Working from more theoretical and experience proven volume requirements, our current run of furnaces work best at roughly 500 to 800 LpM.
- The sides of the bellows will be flat surfaces. This allows us to hold the bags in place with metal strips held with screws. This permits easy modifications to the interior of the bag and plates if required.
- The bellows plates will be cut and fitted with intake holes on both top and bottom. In use, either side can be sealed using a metal cover again screwed into place. In this way the difference between top and bottom mounted air valves can be compared. Physical mounting systems for the bellows, and how this relates to operator strain can be compared. An extension of this is further recording of the related debris fields.
- The distance at hinge point of the bellows will be greatly increased, at least double the current measurement. This will allow the installation of two door type hinges on each plate, greatly improving durability.
- The head block of the bellows is a simple boxed shape. To this can be screwed a removable, even interchangeable, exhaust unit. Different types of valves, port shapes and tube diameters can then be attached to measure their impact on flow.
- The handle for the operator will be a wide wooden D type. This will be mounted directly in line with the bellows hinge axis.

Most of the tests involved are primarily static tests, or short applications of human power to the existing air pipe system. There was more interest than I expected in conducting a full smelt using a proven bellows for air. With a proven smelt (bloom production) DARC will have a certain 'all Norse' demonstration possible.

Darrell

Labels: ,

Monday, December 24, 2007

2007 Experimental Overviews Available

(duplicate of post from 'Hammered Out Bits')

I have been plugging away over the last week taking the various raw data from the 2007 smelt season and getting it formated up for publication on the web site.

First - I have added the 'short form' overview to the series. The new 2007 information (with representative image) can be now seen at:

http://www.warehamforge.ca/ironsmelting/smelt/smelt07/index.html

Second - Working ahead to the research that is planned for this winter, I have taken all our past data and put all the (currently) significant variables into one huge table. This is a bit of a pain to view because of the large number of elements listed for each smelt. It does relate details on furnace, ore, charcoal, process and results.

www.warehamforge.ca/ironsmelting/smeltvariables.html

Neil is also currently in the process of re-designing the entire DARC web site, using a new layout that I think everyone will see as a great improvement when he has finished.

One thing you will see on comparing the two lists of experiments: In the past there had been some confusion over numbering. To the end of 2007, I make my own count at 28 smelts. I include in this all those that I felt I undertook a significant role. Just what 'significant' means is largely in the eye of the beholder. I have actually been at least marginally involved in a number of other smelts - those were I was more of an observer than active participant. This includes those where Lee and Skip were conducting the action.
I have always tried to distinguish clearly between the DARC series of smelts as being those where DARC resources in terms of manpower and raw materials have driven the experiment. For that reason I have not considered the 2005 OABA sponsored smelt at Wareham as part of the DARC series for example. This even though Neil was actually one of the team participating, with Ken Cook as lead charcoal monkey.
So my definitive list of smelt experiments lists DARC has undertook a total of 13 experimental smelts. Members of the group (Gus / Kevin / Dave / Darrell) also traveled to Virginia in 2002 to observe Skip and Lee at a public demonstration, but although we did participate with some grunt work on that smelt, it is not counted as part of the series.

Darrell

Labels:

Thursday, December 6, 2007

'Gangue aux Fer' on Early Iron

Expedition Magazine

University of Pennsylvania Museum

3260 South Street

Philadelphia, PA 19104-6324

Tel: (215) 898-4124


Fax: (215) 573-2497


Volume 49,
Number 3


Winter 2007


Features


Adventures
in Experimental Smelting--Iron the Old-fashioned Way


Elizabeth G. Hamilton


Elizabeth is one of the consistent participants in the EARLY IRON series of symposiums. At Early Iron 3 (2006) she interviewed Lee, Skip, Mike and myself. This article is the result. The link will give you a direct download of the article as a PDF.

Labels:

      Updated: 4 Dec, 2007
Text © Dark Ages Recreation Company, 2007
Photographs © Individual artists
Copyright details
Contact us