sml logo Dark Ages Re-Creation Company sml logo

Monday, November 16, 2009

Vinland 3 on YouTube

Re-Creating the iron smelt by the Norse in Vinland, circa 1000 AD. Members of the Dark Ages Re-Creation Company (http://www.darkcompany.ca) undertake their third smelt in this specific series on November 7, 2009. The result was a 2.9 kg bloom produced from 18 kg of bog iron ore analog. This smelt used all human powered air, supplied via a Norse style double bag bellows.


Footage shot by D. Markewitz & K. Thompson

Iron Masters : Darrell Markewitz & Ken Cook
Charcoal : Sam Fallezone
Ore : Neil Peterson
Records : Steve Strang
Bellows operators : Dave Cox, Marcus Burnham, Sam, Ken, Darrell
Consolidation: Ken, Darrell, Dave, Sam

(duplicates post on Hammered Out Bits)

Labels: , ,

Wednesday, October 14, 2009

Vinland 2 Smelt - On YouTube


This short sequence shows the mechanical piston bellows in operation (dubbed the 'FrankenBellows'). A sequence about 3/4 the way through the smelt, showing the effect of cracking from the clay slab construction used. Last is the extraction and first consolidation sequence, featuring Ken, Neil and Sam.

Cross posted from 'Hammered Out Bits'
Darrell

Labels: , ,

Monday, June 1, 2009

Vinland Iron Smelt (on YouTube)


Based on the archaeology of L'Anse aux Meadows, the Vinland of the Sagas,an experiment by members of the Dark Ages Re-creation Company. This iron smelt uses an analog for the bog ore used in 1000 AD by the Norse to produce a 4 kg bloom.


(see yesterdays 'Hammered Out Bits' blog posting for more details)

Darrell

Labels: ,

Saturday, December 27, 2008

DARC Fall Smelt on YouTube

Friday, July 18, 2008

Ship Building Axes

I have started posting up some commentaries on my current project - a set of ship building tools based on VA artifacts and advice from the Viking Ship Museum in Roskilde. Expect to see a number of postings over the next couple of days. I also will be trying to edit up a short video clip covering working on the Bayeau broadaxe (a YouTube experiment).

http://www.blogger.com/img/gl.link.gif

Darrell

Labels: , , ,

Thursday, July 3, 2008

the Aristotle Furnace Demonstration

(Duplicate of post seen on 'Hammered Out Bits' )
At the SCA event Trillium Wars over June 28-29, the 'Aristotle Furnace' was demonstrated by members of DARC.
The furnace design is the work of Skip Williams, who researched the concept and had built a number of working prototypes to establish a method. I was taught the basics of its construction and operation at Smeltfest 08 back in March. In earlier posts there is a fuller description of the design and workings of this small furnace. It functions by melting scrap iron into a fresh 'puck' of mid to high carbon steel over a relatively short operating cycle.

The two images here are the only ones captured from the recent demonstration. Both images are by Karen Peterson (of course I was engrossed in actually running the furnace.) My primary assistant for the entire process was V. Meghan Roberts, who both helped with the messy work of building the furnace and breaking charcoal, but also proved to be a good bellows operator.
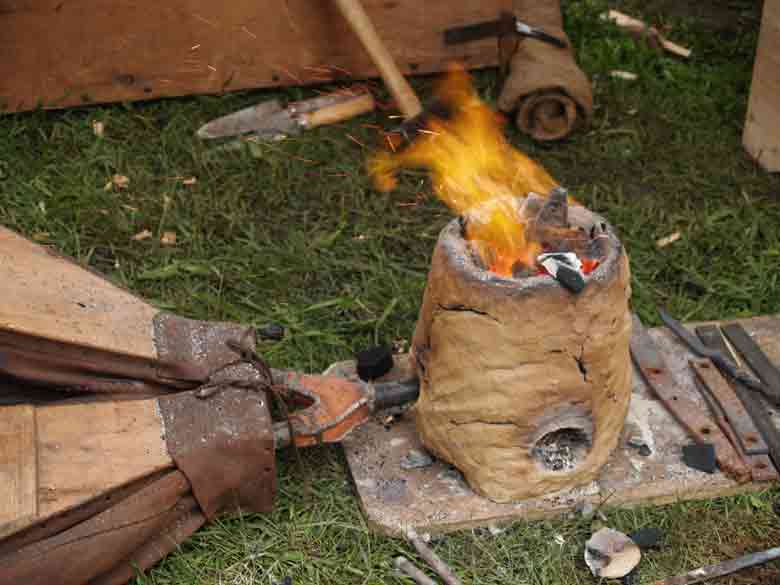
The first is a close up of the furnace itself in action. The body is made up of a mix of horse manure and powdered clay. I had the manure from my farm neighbour, and tried to gather older and drier material. About a half of a standard five gallon pail was first shredded by hand. (Fresh manure does not work up as well, being too moist to easily mix with the clay). To this was added about an equal volume of dry powdered ball clay (from our local pottery supply). Water was then slowly included, to create a mix roughly the consistency of bread dough. Each double hand full was worked to an even texture before it was applied to the furnace. Roughly a half bag of clay was required , a rough cost of about $10 (we had some unused cobb material left over).

The furnace was roughly 15 cm on the internal diameter, standing about 30 cm tall. (This was maybe a bit on the short side.) The base was a slab about 3 - 4 cm thick, the walls roughly the same. Initially there was a air hole cut into the side to fit the bellows tube. This was located about 5 cm up from the floor of the interior, and about 1 cm in diameter into the furnace. The outer side of this hole was roughly conical, to hold the 2 cm diameter bellows tube.

The furnace was constructed on the Saturday, then left overnight to allow the clay to stabilize and partially dry. (We had originally intended to fire on Saturday as well, but there was a lot of activity in the small work space, so we waited to reduce the confusion.)
At the start of the pre-heat phase on Sunday, it quickly became apparent that the single air port would only allow for combustion with the use of forced air from the bellows. As it is always important to provide a gentle heating until all the water is baked out of the clay structure, a second hole was cut into the base. This hole had tapered sides, about 5 cm in diameter on the inside surface. Taking a lesson from Jake Keen, there were two angled holes made to hold a pair of twig sticks. This allowed for manipulation of the plug later when it was hot. The shape caused the plug to be christened 'the pig nose'. The larger air intake allowed the wood splints of the pre-heat to burn correctly. This gentle heating would continue for about an hour and a half. Pre-heat was judged to be complete when there was no longer any white steam visible off the furnace's sides.
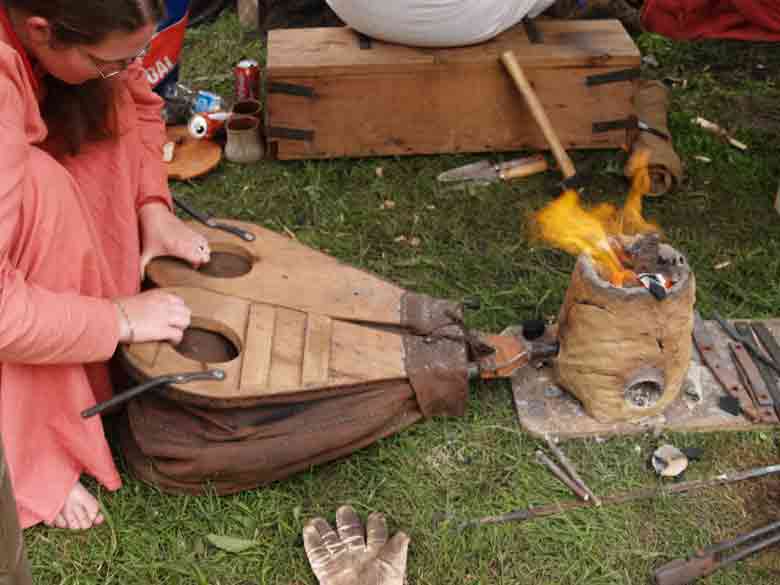
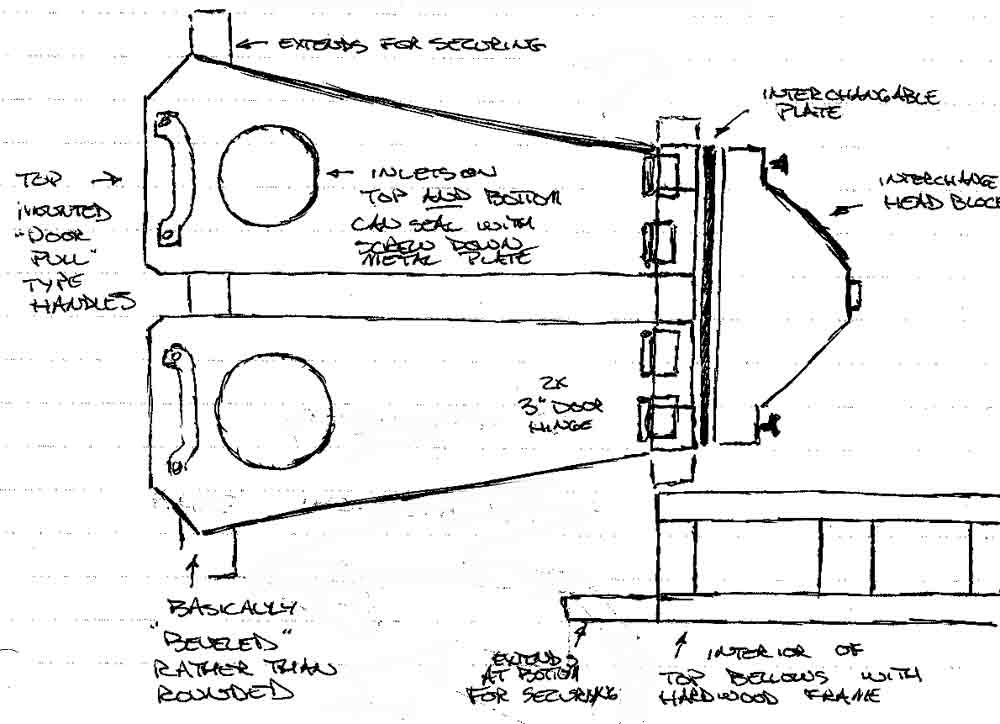
This shows the furnace and bellows combination, along with one of our many volunteer bellows operators. The bellows used is a Viking Age blacksmith's bellows, based closely on the two artifact sources (see earlier posts for a long discussion of this equipment). In total we ran the furnace through three cycles, with quite differing results from each. The primary reason for this inconsistency was the variation in air volumes created by the efforts of the various operators. Almost all of them had no experience with hand bellows, much less this specific Norse type. Not too surprisingly, those who had previous experience with the bellows type produced the most suitable air deliveries for the process at hand.

For the first cycle, the metal used was a short length (about 25 cm) of standard 1/2 inch round mild steel rod. The air delivery was by far the most suitable and consistent, as I undertook the bellows operation for this cycle. (I certainly was the only one who had ever seen the furnace in operation, plus had considerably more experience working hand powered bellows.) Mehgan also assisted on the bellows, but had paid close attention and pretty much duplicated my method and rates. The fuel was also smaller particles, as most of it had been gathered from what remained of the forging operation from earlier in the day. Most of the pieces were still ignited, lightly ash coated, and roughly 'walnut' sized. The end product of this cycle was the desired lump of higher carbon metal 'bloom', in this case with a short stub of the parent rod (about 3 cm worth) still attached.
Some problems with equipment placement caused a mad scramble getting this piece from the furnace to the anvil, so by the time the hammer was striking the metal had dropped to the low oranges. Even still the material proved to be forgable metal, at a guess a mid carbon steel (no grinder was available for spark testing).

For the second cycle, the metal used was a piece about 30 cm long of recycled wagon part, flat bar about 1/4 x 1 inch stock. The material had earlier been tested an appeared to be a lower carbon steel (not actual wrought iron) and was heavily surface pitted. The bellows operation for this sequence was far less consistent, with a lower air volume on average and thus both lower temperatures and longer consumption rate of fuel. This created both a slower conversion of the bar and also suggested more possible soak time to absorb carbon from the interior. In actual fact the end result proved to be a high carbon cast iron. The puck of material produced was not forgable, fragmenting under the hammer.

On the last cycle, the metal used was a piece of 3/8 square mild steel bar, again about 30 cm long, recovered from a damaged fire tool. A number of people took turns on the bellows, most significantly Sam, who had his blacksmithing experience from his Ango-Saxon forge to guide him. The air rates fluctuated most widely over this cycle. This again could be seen in the results. The metal fragmented under the hammer, with the bottom half splitting off clearly as brittle cast iron. The upper portion of the puck appeared to be useable metal, but was certainly tougher to shape that the metal from cycle one. On a guess this material should test out to a higher carbon tool steel.

Although the furnace did come through its repeated uses in reasonably good shape, it did not survive being dropped out of the truck while being unloaded the next day.

The method of manufacturing the furnace was well demonstrated, and the horse manure / clay mix seems idea for the construction. The general principle of this small steel furnace was again proven. It remains clear that bellows operation is the largest variable, with experienced operators being critical to the function of the furnace. The great advantages of this furnace, ease of construction and speed of a single use cycle was again demonstrated. More work needs to be done to fine tool the correct sequence, which repeated uses to accumulate experience will provide.

Labels: , ,

Monday, January 28, 2008

2008 - Directions for AIR

This is a shortened version of an ongoing series of posts over on the Hammered out Bits Blog:

The core members of the DARC smelt team (Neil, Kevin, Dave and Ken) were up over the past weekend. We discussed what we are learning, what we have done, and what direction this year's campaign at the smelter should take.
The main thrust will be work towards the reconstruction of the Icelandic grass sod smelter. At present we have two pieces of technical work to refine. The first (not dealt with there) is the creation of a workable bog ore analog. The second is to finally get an effective bellows design.

2008 year experiments


'Test Bed' Double / Twin bellows for iron smelting

1) Neil has ordered a copy of the small blacksmith's bellows for his glass bead furnace project. This will be made up using the current physical measurements, but with two important changes.
- First the bag will be cut with only two leather lames - giving a maximum loft in use of 30 cm. This will reduce the folding of what is just unused leather surface. The wooden frame will be made up, and then a fast test bag will be made up out of taped plastic. This should allow for a fast test series to be made to measure the air volume with the shorter bag.
- If this test proves effective, then the bags will be made up using a lighter (likely deer skin) leather than has been used on previous versions.
- The centre seam will be fitted with a more rigid metal hoop than has been used in the past (at least 3/16, if not 1/4 inch round steel rod).
Taken together, this new unit should allow us to record more accurate numbers for the possible use of the historic patterned bellows in smelting.

2) A second 'test bed' bellows will be made up (as seen in the illustration above).
- Measurements for this bellows will be determined by taking a theoretical model which is able to produce roughly 1500 LpM. The desired working air volume is actually 1000 LpM. Numbers and images from Jens suggests a true working efficiency of about 2/3 theoretical is likely (assuming good design). Working from more theoretical and experience proven volume requirements, our current run of furnaces work best at roughly 500 to 800 LpM.
- The sides of the bellows will be flat surfaces. This allows us to hold the bags in place with metal strips held with screws. This permits easy modifications to the interior of the bag and plates if required.
- The bellows plates will be cut and fitted with intake holes on both top and bottom. In use, either side can be sealed using a metal cover again screwed into place. In this way the difference between top and bottom mounted air valves can be compared. Physical mounting systems for the bellows, and how this relates to operator strain can be compared. An extension of this is further recording of the related debris fields.
- The distance at hinge point of the bellows will be greatly increased, at least double the current measurement. This will allow the installation of two door type hinges on each plate, greatly improving durability.
- The head block of the bellows is a simple boxed shape. To this can be screwed a removable, even interchangeable, exhaust unit. Different types of valves, port shapes and tube diameters can then be attached to measure their impact on flow.
- The handle for the operator will be a wide wooden D type. This will be mounted directly in line with the bellows hinge axis.

Most of the tests involved are primarily static tests, or short applications of human power to the existing air pipe system. There was more interest than I expected in conducting a full smelt using a proven bellows for air. With a proven smelt (bloom production) DARC will have a certain 'all Norse' demonstration possible.

Darrell

Labels: ,

Thursday, January 3, 2008

Historic Air?

I have been doing some background research into air delivery systems for Pre-Conquest, mainly in relation to my ongoing experimental iron smelting. As well, I have worked with a fair number of modern and historic forge set ups.

On a recent NORSEFOLK2 discussion, here have been some suggestions given about possible air systems for use in the forge. Right off the top, you have to determine if you attempting HISTORIC or MODERN equipment.

Some notes on the suggested equipments:

'Double Bellows': Two chambers, one beside the other, separate exhausts connected by a Y tube. Alternate filling and exhausting each side to produce constant blast.
Evidence suggests individual chambers roughly 30 cm wide x 50 cm long.
ONLY documentable system for the Viking Age.

'Great Bellows': Two chambers, one on top of the other. In northern Europe, typically a top mounted leaver pumps the bottom chamber, which in turn fills the upper chamber. From the upper chamber air is delivered to the forge.
May vary in size, but typically very large, on the order of 50 cm + wide by 100 - 150 cm long, thus not portable.
I have not been able to date this bellows any earlier than about 1300 +/-

'Box Bellows': One large rectangular box with a central plate which can be pulled/pushed back and forth. Valves on both sides, so as one side fills the other exhales.
Can vary considerably in size, from about 30 x 30 x 60 cm to several metres.
Asian ONLY - never used in Europe.

'Skin Bag': One or two individual leather bags with some method of closing an open top, the lower edge leads to forge or Y tube. I have seen either two sticks or a plank with a central hole and hand strap used to control this.
Size limited by effective operation method, bag roughly 30 x 30 x 30 (depending on closure method)
Pre Roman ONLY (often referred to as 'Celtic Iron Age')

I have seen a kind of concertina bellows set up, which may date back to the 1700's.
Other systems in use by modern blacksmiths ALL date no earlier than 1870's.

There are a number of posts discussing the development of a re-construction Norse era forge set up over on my own blog (Hammered Out Bits).

If you are attempting an actual recreation of Norse smithing equipment, your only option (based on evidence) is a charcoal side blast forge using a double bag bellows. Used correctly, this small scale set up will produce welding temperatures. The main hurdle for the modern smith is learning to work inside the limitation imposed by the much smaller heat zone created. A reconstructed Viking Age forge will only heat about 4" or so of your material to correct forging temperatures, so you need to work quickly and efficiently.


Images off the DARC web site - at Haffenreffer in 2004.

Darrell

Labels:

Thursday, February 8, 2007

On Norse Hammers

(this is a duplicate post from an entry from 'Hammered Out Bits' - included here primarily as a test to see what a full sized posting will look like with various backgrounds. This can be edited and saved when the DARC blog is fully functional)


Nickolas wrote:

> I have a question I hope you can help me with. I've been reading about the Mastermyr find, and I'm curious about the hammers. Were they wrought iron, or did they have a wrought body with steel peens and/or faces?


If you are real serious here, you should get a copy of

the Mastermyr Find
Arwidsson and Berg
AlmQuist & Wiksell - 1983
91-7402-129 X

Norm Larson Books in California got the rights to re-publish a couple of years back and was selling these for about $25 US a copy.

According to the report. Only one of the hammers was tested for metal content. That was the large hand sledge (# 69) at 3.3 kg. This shows the PEEN end as forge welded mid carbon steel but welded on to the iron body. Makes some sence if you figure its smaller and thus more likely to deform.

The section on metallurgy mentions most of the hammers are formed of a single mass of iron "..the objects were made from fairly homogeneous iron pieces." (Note that the axes tested have welded higher carbon edges)

If you look at the hammers found, the faces on two of the mid sized tools show significant mushing out at the face, whihc certainly looks like use pattern on softer iron bodies. All show some upsetting at the face - but I personally take this as partially the effect of the original forging to shape.

A fast visual reference : take a look at the blacksmith's shop reconstruction I put together for 'World of the Norse'

Labels: , ,

      Updated: 4 Dec, 2007
Text © Dark Ages Recreation Company, 2007
Photographs © Individual artists
Copyright details
Contact us