sml logo Dark Ages Re-Creation Company sml logo

Thursday, November 20, 2008

Exploring the Viking Age in Demark

Right now I am preparing for an upcoming lecture for the Peterborough SCA group. This is to be held at Trail College on Wednesday November 26 at 8 PM.

The topic is an overview of my recent research trip to Denmark. I will be showing some of the artifact images I collected, and talking about the museums I visited.

So, I figured I might as well kill two birds with one stone. As it turns out, the birds were a sparrow ( the lecture) and an emu (a new AV publication). I am sorting all my 400 plus images, adding commentaries from my notes and formating the whole pile into a reference I hope to have ready to sell in time for Yule. The contents will work via a large set of interlocked 'web pages' that will access through an standard web browser. As most of the images are the large format from my camera (mostly 5 MGP) the total content will have to go on to a DVD disk. This will also allow just the images to be viewed on a standard table top player and TV combination.

As a teaser, this is a short piece of one of the displays I saw at the Roskide Museum. The images here are just the thumbnails - you will have to wait for the publication to see the larger versions!

Because of formating problems, please look over at Hammered Out Bits ...

Labels: , , ,

Friday, July 18, 2008

Ship Building Axes

I have started posting up some commentaries on my current project - a set of ship building tools based on VA artifacts and advice from the Viking Ship Museum in Roskilde. Expect to see a number of postings over the next couple of days. I also will be trying to edit up a short video clip covering working on the Bayeau broadaxe (a YouTube experiment).

http://www.blogger.com/img/gl.link.gif

Darrell

Labels: , , ,

Saturday, May 31, 2008

Viking Ships at Roskilde

Today is smelter prep / workshop day for DARC, against our upcoming spring smelt on June 14. So I wanted to get my presentation version of my Denmark images sorted out and transfered over to DVD. At this point I have taken the various panoramic images I shot and patched them together. As a bit of a break from my concentration on iron smelting here, I have posted a couple of images from the Viking Ship Museum in Roskilde.
View of the interior - Note that the ship is tied to the dock on the STARBOARD side.View of the hull at the waterline on the port side
The first are two views of the 'Ottar', a reconstruction of Skuldelv 1. This is a knorr (knarr over here), an ocean going freight vessel. The original was built in Sognefjorden Norway. This is the hull that Paul Compton's 'Viking Saga' is based on.
The specifics from my notes:
length - 16.5 m
width - 4.5 m
capacity - 20 tons / 35 cubic meters
draft (laden) - 1.3 m
sail speed - 12.5 knotts (empty?)
construction - Denmark, circa 1030
View of the interior, this ship tied 'to port'.
The last I am pretty sure is the reconstruction of Skuldelv 6. This is a medium sized coastal working ship for fishing or trade. There were a number of boats at the museum dock on this basic pattern These are obviously the work horses of the sailing programs there.
The specifics (from the text):
length - 11.2 m
width - 2.5 m
capacity - 3 tons
construction - Norway, circa 1030

I got more detailed in my notes with the other museums I visited. I had wandered over the dock area before the museum opened in the morning to take these images. My main focus at the Viking Ship Museum was actually on construction and especially working tools. (This related to an ongoing project for Parks Canada to produce a complete set of Viking Age ship building tools.)

Labels: ,

Tuesday, May 13, 2008

Tents - Ribe Viking Centre

Sam wrote:

I need to make new A-frame for a tent ... What size boards have some of you used for an A-frame?

(Readers should refer to the section on the DARC web site depicting past camp presentations for images of various A frame tents the group uses.)

I take it you have a COVER for a standard 'wedge' tent?
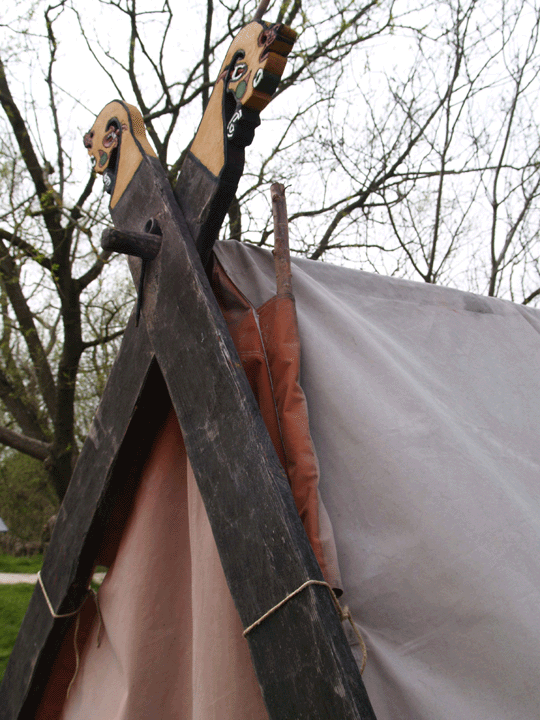
First decision is if you want the beams inside the canvas (like I set mine up) or outside (Like Neil and most others do ). Advantage to inside is that it holds the tent sides open better. Disadvantage is that you need a larger hole at the peak for the boards to fit through. Its also more difficult to set the tent up. Outside planks with an X of ropes from corner to corner is the way most people solve the sagging sides but keep the tent fast to set up.

See the set of plans on the Encampment part of the Wareham Forge web site
frame
cover

So you are making measurements for the side rails and the ridge pole from the length of the canvas. Again along the ridge line and each of the sides (likely the same measurement). Then you add on the extra for the joints and pins, maybe an extra 6 inches on either end.

The bottom of the three end boards should be the length of the base line of the door end and back end of the tent. Plus the extra for the insert of the side rail beam. If you check the plan drawing you can see what I mean.

On the two uprights, the measurement is taken from the corner of the base line up to the peak. Then you add on the joint amounts for top and bottom (as with the bottom beam). On top of the planks goes the allowance for any kind of carved head you want to add to the finished support structure. Typically this amounts to 8 - 12 inches extra on each of the four pieces.

The actual Oseburg tent is something like 16 x 16. Neil's tent is patterned on that version (bloody huge). My own is about 2/3 scale, with the side rails at about 10 foot and the carved boards at roughly 11 feet. Fits very comfortably on top the Astro.

Consider your materials in terms of cost and strength At a rural building supply, you can usually get 'barn pine' - used for exterior planking on barns. The cost for this rough one side in 1 x 12 inch is roughly $1 per foot (Ontario Canada). With a large table saw that you can use to rip these in half to 1 x 6 planks. I have standard 2 x 4's and ripped them as well, down to 3 inches wide, for the two side rails. Taken together this modifies the look of the boards away from 'non standard' lumber.
I strongly suggest using a complete sapling as by far the best material to use for the ridge pole - in terms of strength vs size. A little hunting and you should be able to find a spruce or pine sapling the right size for the ridge pole. You will need a piece long enough when cut to span the ridge, typically this will work out to be roughly 4 inches at the base, tapering to about 1 1/2 where cut at the top for length.

Just for comparison, here are a couple of images of tents from the Ribe Viking Centre. For background, this is an 'open air museum' as they are called in Denmark (living history site for us NA's). It is loosely broken into three sections. The first is a recreation of a large section of the original market place layout of Ribe itself, as it existed in the Viking Age. A timber plank street is flanked by regular plots. These are bounded by ditches held in place with low withy sections.
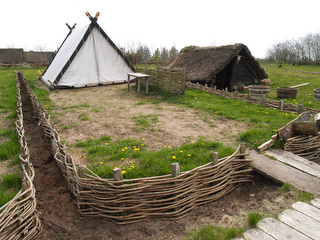
The original Ribe Market would NOT have had any permanent buildings. There are several in the re-creation, each some variant on the 'pit house'. These are small, shallow dug outs that have roofs of either thatch or turf, used as various workshops (more on these in a latter posting).
A couple of details on the tents which may prove interesting. First, there were at least five on site that were part of the permanent fixtures. (I was visiting in late April. The site was closed at that point, with normal season opening at least two weeks off.) These are all fairly large, built around a roughly 12 x 16 foot print (maybe more in some cases). Large enough that Trene's bead making furnace is operated without problem from inside the tent for example. This is the tent workshop in the image above.
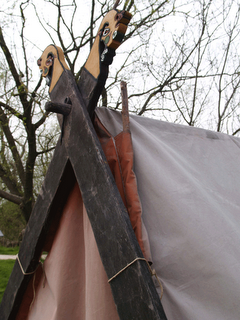
The covers are set up with pockets along the edges, both sides of the door and on the lower bottom seam. Into these slotted pockets are run thin natural poles. (Denmark has no shortage of willow to provide the thin straight saplings.) These poles are then lashed to the wooden frames. This method is considerably more durable than the rope or leather ties commonly used on our reconstructed tents. The covers themselves are all a modern heavy commercial tent canvas. Some were dyed most were the standard (unnatural!) bright white, with brass grommets showing. (Remember that these are in constant public use, so squint a bit as you look at them - and be forgiving.)
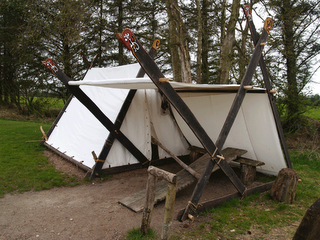
Several of the tents were also set up with the method of opening the sides up as awnings seen in the image above. (This tent was the storage and working area for the archery field.) The addition of the extra side board and linking rail is certainly more durable than the 'single pole' method that I have used in the past for the same effect. Significantly more material required, and thus unlikely inside a strictly historic context.

Labels: ,

Tuesday, April 1, 2008

Wooden Beams for Tents

Note: This is adapted from a post to NORSEFOLK.

When planning the materials for a period tent, either A frame or Geteld type, consider something about the structural nature of wood as it applies to the loads imposed by tents. Then work backwards against availability and cost (rather than the other way round).

Now several of my old friends will be rolling their eyes. Repeating my own mantra back to me : " Metal good - wood EVIL " !

The thing to consider is grain in the wood - and how grain effects strength.
You are applying two load types to the wood used in a tent. One is compression - the weight of the tent itself applied straight down the long axis of the beam. This aspect effects the uprights, especially the vertical pieces on a Geteld style. The second load is a sideways thrust, contributed by both tent and the force of wind against the horizontal cross beam.

Against these forces, consider the direction of the grain in the timber. Also the relative density of the wood, and how fine the grain is. Individual species will also differ in their basic flexibility (I suspect largely determined by the relationship of density and grain structure - but ask a wood guy.) Fast growing soft woods ( southern pine) are going to have the weakest grain structure. Slow growing hard woods (northern oak) are going to have the strongest. Certain species (as noted by others) will combine strength and flexibility - ash for example.

Modern timber is almost without exception cut to maximize production. This most often results in individual pieces having diagonal lines of the grain that run against the line of the beam: ///////// : Imagine applying force to either the end or the side of a stack of these diagonal lines...
On the compression members, there will be less effect (leading to failure). Practical experiences (related by many here) show that even smaller sizes of cheaper, lighter materials are less likely to fail. You can likely get away with 2 x 2 pine for the uprights.
The greatest effect will be seen on the horizontal beam. The sideways stress from wind can easily shear sawn lumber. We all have seen the warping effect that even the weight of a tent cover can exert on sawn planks.

If you could fix a plank used for the horizontal beam so that it rested with the largest dimension at 90 degrees to the ground : l : this would put the greatest mass of wood against the line of greatest stress. (It would not help with the sideways stress of wind load however). In practice, this would require the use of some kind of quite strong mortise and tendon arrangement where the upright joined to the horizontal. The tenancy is for the tall thin cross section to try to 'roll over', so there is a great sideways force applied to the pin used to join the two members.

Historically, timber was not sawn - but split. This results in the grain running in straight lines along the length of the timber, so this diagonal weakness in the grain is not present. Think of the thin split timbers used for ship construction.

The other way to avoid the whole problem is to use whole saplings. This gives the gain an uninterupted set of circluar 'tubes' that provide the maximum strength for the size and weight of the material. This is by far the superior solution to the problem of stress loads.

Getting the required saplings, for the longer horizontal beam especially, may prove a bit of a problem for urban dwellers. I'd suggest contacting your rural living friends. My own A frame uses a spruce sapling cut from about a 16 foot tree down to the required 12 foot length. It runs about 4 inches to about 2 inches. This tent is over 15 years old, and has weathered repeated violent storms (including one legendary one at L'Anse aux Meadows in 96). The main overhead beam still remains solid and straight.
In practical terms, you want to look for a small grove of trees growing too close together, This tends to force them upwards - rather than spreading outwards. The trees towards the centre are likely to have few sideways branches as well. (Imagine a single pine cone hitting fertile soil.)

One other important effect of the use of natural saplings is that you are also duplicating the type of wood used by the Norse. No cut 2 x 2 in the Viking Age. We have replaced all our commercial uprights with saplings for just that reason.

There are a set of simple plans for a classic Norse A frame tent available on the Norse Encampment series:
Frame
Cover

oh - one piece of advice:
Strip off all the bark. With the increasing contamination from alien insects, many regions do not allow transport of any timber with the bark on. You can NOT transport bark on timber across the US / Canada boarder for example. Easy to do with the wood green.

Darrell

Labels: ,

Monday, February 19, 2007

Norse Weapons - who has what?

(once again modified from a post to Norsefolk)

When you look at the artifacts from the Viking Age, there are quite noticeable differences in terms of 'national preference' against weapon type as found in burials. Viewed as a very rough overall picture (only!)

Norway - swords
Sweden - spears
Denmark - axes

In terms of more of one type that dominates inside the area. All types are of course found, so its not as simple as 'I'm a Swede - so I should use a spear'.

As you might of guessed from the recent series of articles, there are wealth and status considerations to make related to a specific historic character and what weapon to carry. I have not specifically seen any data on the relative frequency of swords in burials overall. Just about everyone had a small tool knife, but my quick gut reaction is to say swords were like modern Rolex watches in terms of distribution through the population.

Generally swords / axes / spears are found only in male burials.
One real big problem with that generalization is the 'male dominant' angle . If there is a weapon found the sex is automaticly determined as male - without further examination into possible gender (converse is glass beads and female). Skeletons are only rarely sexed using methods OTHER than object generalizations as it turns out. There are some obviously female burials which are found with 'male' objects, particularly swords. Are these intended as working tools - or are they instead statements of status (which is more likely)? As I remember , axes are almost never found in female burials for example.

Swords specifically are high cost, special function, tools. Remember than few individuals in Norse society were full time wariors. If you are primarily a farmer who goes on raids a couple of times over your life span, then investing in an axe makes a lot more sense. This would be a tool axe as well - which explains why there are so many more small, multi function head sizes found.

Swords are also herloom objects. So there is scope there to interpet older blades which have been re-hilted. Stories collected on family blades. High quality swords might easily have a larger reputation than the person holding it.

I personally have a real interest in how simple technical factors can combine or interact inside a culture to create the tradtitions and customs that define a people. I think we are seeing how the metalworking problems are shaping the Norse.

Darrell
(cross posted from Hammered out Bits)

Labels: , ,

      Updated: 4 Dec, 2007
Text © Dark Ages Recreation Company, 2007
Photographs © Individual artists
Copyright details
Contact us