sml logo Dark Ages Re-Creation Company sml logo

Thursday, July 31, 2008

Bead Page Done for now!

The bead charts have all been created and posted. The bead article itself has been updated with more information about how to use the charts. Several small errors in the existing charts have been corrected, and the final bead period charts have been uploaded!

I am working to add more data from Dan Carlsson's Bead CD with the Gotland finds, and Lundstrom's work with the Helgo beads. That information will take a while to work in and is unlikely to change the charts.

Next bead update will be pages for the 3 bead making sessions we have done since the last update. So busy doing it is hard to make time to post about it!

Neil

Labels:

Monday, July 28, 2008

Bead Page - Another update

It appears that some information was missing from the copy of Callmer's Trade Beads that I had. I have updated the bead page, and stone bead page. The missing information made only minor changes to the average numbers of beads previously listed.

In addition the BP VII (885-915 AD) charts have been added. Just 3 more periods to go!

Monday, July 21, 2008

Bead page updated

The Bead Page has been updated with bead charts for Period I (790-820), II (820-845), and III (845-860). The charts for Period IV (860-885) have also had a few errors fixed up.

We'll work on adding the rest of the periods soon.

Friday, July 18, 2008

Ship Building Axes

I have started posting up some commentaries on my current project - a set of ship building tools based on VA artifacts and advice from the Viking Ship Museum in Roskilde. Expect to see a number of postings over the next couple of days. I also will be trying to edit up a short video clip covering working on the Bayeau broadaxe (a YouTube experiment).

http://www.blogger.com/img/gl.link.gif

Darrell

Labels: , , ,

Wednesday, July 16, 2008

Bead thoughts

There has been an update to the Viking era beads article.

http://www.darkcompany.ca/beads/beads.php

I have been asked a couple of new questions and have added the answers into the page. The first question dealt with which colour is the most common. The other had to do with how common monochrome beads were compared to the fancy beads.

I also added some more thoughts on the number of beads on a necklace.

There are more bead charts in production covering the missing periods.

Neil

Labels:

Wednesday, July 9, 2008

New projects posted - Carving tools and Skates

Steve has provided a second post about his creation of a pair of skates and a couple of attempts to use them.

http://www.darkcompany.ca/projects/skates/index.php

Steve has also made available some notes and pictures of his carving tools.

http://www.darkcompany.ca/projects/stools/index.php

Labels:

Sunday, July 6, 2008

Glass Experiment Questions

With three bead melts done, and another two in the planning stages it would be worth listing some of the questions facing us. I fully expect this list to expand with time.

Tools

Tool artefacts include two mandrills (one with a bead stuck on, one without), the 'warming plate'. Tweezers can be inferred from the impressions on the ends of some glass stringers.

Our current planned list of tools for each workstation is:

1. Long tweezers (placing glass in the furnace)
2. Short tweezers (handling stringers near the furnace)
3. Mandrels (a dozen or so)
4. Snips (cutting stringers)
5. Fire rake (adjusting the charcoal bed to provide a workspace)

There will also be shared tools
1. Long fire rake
2. Crucible tongs

This represents a LOT of iron tied up.

QUESTION: Could some parts of this work be done with soaked green twigs instead?

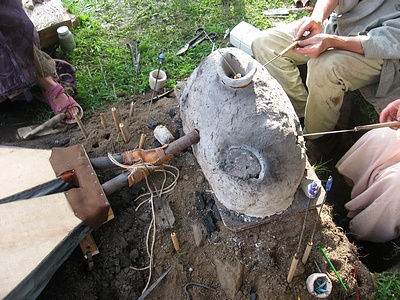
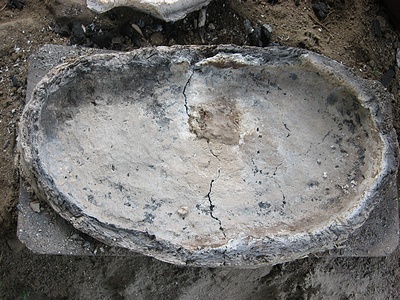
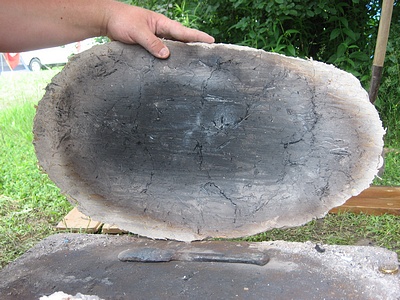
The warming plate and crucible bits are also an interesting question. How are they used?

QUESTION: Are the glass tesserae placed on the plate in the furnace, heated up and pressed onto the mandrel?

QUESTION: Would a ceramic plate work?

QUESTION: Can a piece of charcoal work? The answer to this seems to be yes as Darrell and Unnr have both made beads this way already.

QUESTION: Are tesserae placed in a crucible and melted, with stringers/rods being drawn out using tweezers?

Many beads are shaped, not just flat sides but deep ridges, cones, bicones. How was this done? For a modern lampworker there are shaped marvers of metal or graphite. No artefacts exist.

QUESTION: Can a soapstone marver do each of these shapes?

QUESTION: What about bone marvers?

QUESTION: What about a knife as one book theorizes?

Technique

Many of our beads show texture problems. These appear to fall into two groups:

1. Contact with walls/charcoal - this leaves a fairly visible mark. Similar marks do exist on some period beads, but with more skill development I expect this to gradually reduce in frequency.

2. Ash pitting. The surface gets touched by floating ash which leave small dimples in the glass or a rough texture. This texture is also visible on many (but not all) artefacts.

QUESTION: Is the pitting on the artefacts actually caused by ash or by another issue?

QUESTION: Can the working ports/air flow be adjusted to reduce/eliminate the ash impacts?


How are beads actually made?

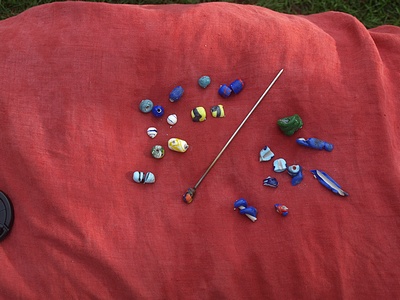
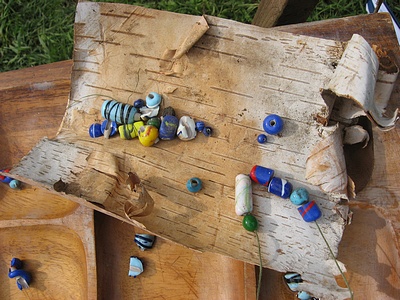
Callmer's book lists several different construction techniques, some of which leave traces we can see in the artefacts, others of which would not be distinguishable. The artefacts include glass rods (0.5mm to 5mm diameters - thus stringers and full sized rods); tesserae (glass bits for making mosaics), and cullet (broken glass bits from drinking beakers etc)

QUESTION: Can you make beads by picking up broken bits onto the mandrel? (yes - see above)

QUESTION: Can you make beads using rods as modern lampworkers do? (yes - I have done this as have others)

QUESTION: How can we reduce the post - creation breakage? i.e. how can we best anneal the beads?

QUESTION: How can we reduce breakage as we pull them off the mandrel?

QUESTION: Is the tapered shape of the artefact mandrels important?

QUESTION: Was a release/slip used?

QUESTION: How do you overcome the problems of mixing glasses with different Coefficients of Expansion? (more annealing questions)

QUESTION: How can you make some of the shapes we see?

QUESTION: Do each of the methods Callmer shows actually work?

QUESTION: What are the specific signs that a particular technique was used? (if any)

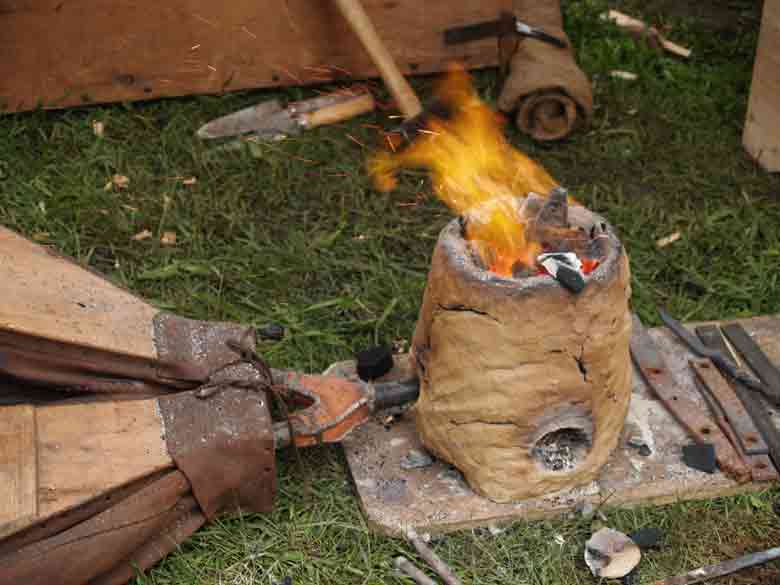
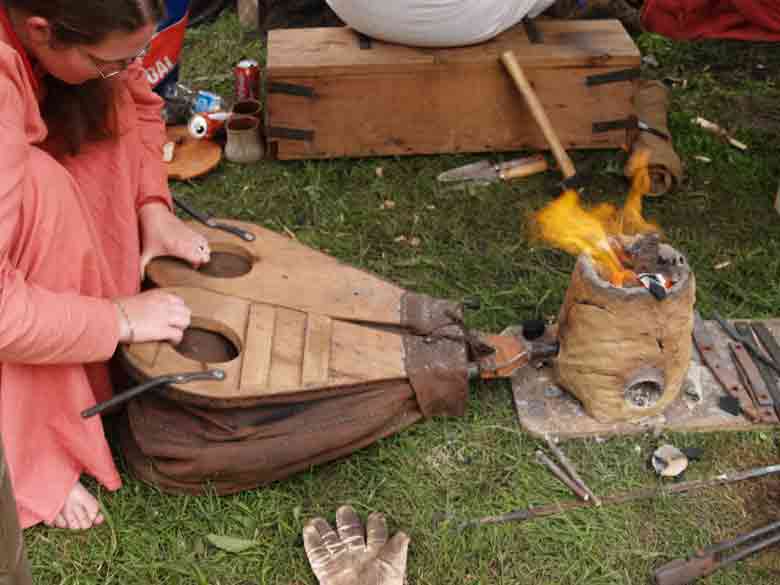
This does not even begin to address the questions on work area layout we will be examining when the Mark III is built. The question is "what does the upper part of the furnace look like in terms of openings, texture, air flow patterns, chimney's and so on".

I think that should keep us busy for now....

Labels:

Saturday, July 5, 2008

Feeding Re-Enactors

Or how do we reset our modern sensibilities?

Over the years of being one of the main food providers at the varying levels of demo that DARC takes part in, my biggest challenges have been mostly, finding the time ahead, in a life that’s pretty full of other activities, to get ready. Fortunately, I find that food fascinates me, and drying supplies, or making ahead, and planning it all, amuses me. The one real conundrum has been in crossing borders. All of a sudden I’ve lost my easy ability to prepare our own supplies to take, especially meat, and have to rely on local groceries. (No, the Norse didn’t really eat pepperoni, but it was the only dried sausage available at your store!)

But in a demo situation, it’s far easier to adhere to a more plausible menu of foodstuffs. On the one hand, I’m preparing it before the public, so my methods will only be the appropriate ones. And I find the people I’m feeding are far more accepting of whatever I give them, when it’s the oasis in a busy day of talking to the public. (Not to mention that after the demo, we’ll probably be eating out somewhere, and they can suit their own tastes!)

However, there are occasions where we camp for ourselves. What then? We had already decided in our formative period, that morning was often a time of relaxed authenticity. Partly because some of us like our coffee in the morning; but also because that gave us a period of time in which we could discuss aspects of the whole process, and review gear, etc.

When it comes to food, though, beyond that pot of coffee, I truly prefer historical foods, and more appropriate methods. And when cooking for myself, that’s not really an effort. (Mind you, I occasionally stray out of one time zone a bit, if I really have urges for experimentation with some other things… I don’t get enough time cooking over fires to work my way through the entire list of things I want to try!)

I have found that when cooking for others, it’s much harder to toe that historic line. Or when cooking for a longer period of time. Our modern tastes and sensibilities get in the way, no matter how much we try to suppress them.

I often dry meat, for example. And while I’ve adapted the ingredients in varying jerky recipes to be something more in keeping with the spicings available to the Norse, it seems highly unlikely that they spent time adding flavourful marinades to meat they were drying as a means of preservation. A simple brining makes sense, because of the useful properties of salt. But plain brined and dried meat really just doesn’t cut it as a ‘snack food’ to the modern tongue. It works well as something for the soup pot, and I’ve used it as such. But for eating? Not so much.

Yet, in the real context, a bit of dried meat would probably have been quite the decent item to stave off some hunger, and the fact you had it at all would probably have been all that mattered.

So, when faced with a small crowd of people who find plain water something for washing with, not drinking, or a simple soup of dried vegetables or salt fish, less than inspiring, especially if it’s what you had yesterday and the day before, and the day before that…

It definitely becomes more of a challenge!


*Duck for Dinner.


~vandy

Labels:

Thursday, July 3, 2008

the Aristotle Furnace Demonstration

(Duplicate of post seen on 'Hammered Out Bits' )
At the SCA event Trillium Wars over June 28-29, the 'Aristotle Furnace' was demonstrated by members of DARC.
The furnace design is the work of Skip Williams, who researched the concept and had built a number of working prototypes to establish a method. I was taught the basics of its construction and operation at Smeltfest 08 back in March. In earlier posts there is a fuller description of the design and workings of this small furnace. It functions by melting scrap iron into a fresh 'puck' of mid to high carbon steel over a relatively short operating cycle.

The two images here are the only ones captured from the recent demonstration. Both images are by Karen Peterson (of course I was engrossed in actually running the furnace.) My primary assistant for the entire process was V. Meghan Roberts, who both helped with the messy work of building the furnace and breaking charcoal, but also proved to be a good bellows operator.
The first is a close up of the furnace itself in action. The body is made up of a mix of horse manure and powdered clay. I had the manure from my farm neighbour, and tried to gather older and drier material. About a half of a standard five gallon pail was first shredded by hand. (Fresh manure does not work up as well, being too moist to easily mix with the clay). To this was added about an equal volume of dry powdered ball clay (from our local pottery supply). Water was then slowly included, to create a mix roughly the consistency of bread dough. Each double hand full was worked to an even texture before it was applied to the furnace. Roughly a half bag of clay was required , a rough cost of about $10 (we had some unused cobb material left over).

The furnace was roughly 15 cm on the internal diameter, standing about 30 cm tall. (This was maybe a bit on the short side.) The base was a slab about 3 - 4 cm thick, the walls roughly the same. Initially there was a air hole cut into the side to fit the bellows tube. This was located about 5 cm up from the floor of the interior, and about 1 cm in diameter into the furnace. The outer side of this hole was roughly conical, to hold the 2 cm diameter bellows tube.

The furnace was constructed on the Saturday, then left overnight to allow the clay to stabilize and partially dry. (We had originally intended to fire on Saturday as well, but there was a lot of activity in the small work space, so we waited to reduce the confusion.)
At the start of the pre-heat phase on Sunday, it quickly became apparent that the single air port would only allow for combustion with the use of forced air from the bellows. As it is always important to provide a gentle heating until all the water is baked out of the clay structure, a second hole was cut into the base. This hole had tapered sides, about 5 cm in diameter on the inside surface. Taking a lesson from Jake Keen, there were two angled holes made to hold a pair of twig sticks. This allowed for manipulation of the plug later when it was hot. The shape caused the plug to be christened 'the pig nose'. The larger air intake allowed the wood splints of the pre-heat to burn correctly. This gentle heating would continue for about an hour and a half. Pre-heat was judged to be complete when there was no longer any white steam visible off the furnace's sides.This shows the furnace and bellows combination, along with one of our many volunteer bellows operators. The bellows used is a Viking Age blacksmith's bellows, based closely on the two artifact sources (see earlier posts for a long discussion of this equipment). In total we ran the furnace through three cycles, with quite differing results from each. The primary reason for this inconsistency was the variation in air volumes created by the efforts of the various operators. Almost all of them had no experience with hand bellows, much less this specific Norse type. Not too surprisingly, those who had previous experience with the bellows type produced the most suitable air deliveries for the process at hand.

For the first cycle, the metal used was a short length (about 25 cm) of standard 1/2 inch round mild steel rod. The air delivery was by far the most suitable and consistent, as I undertook the bellows operation for this cycle. (I certainly was the only one who had ever seen the furnace in operation, plus had considerably more experience working hand powered bellows.) Mehgan also assisted on the bellows, but had paid close attention and pretty much duplicated my method and rates. The fuel was also smaller particles, as most of it had been gathered from what remained of the forging operation from earlier in the day. Most of the pieces were still ignited, lightly ash coated, and roughly 'walnut' sized. The end product of this cycle was the desired lump of higher carbon metal 'bloom', in this case with a short stub of the parent rod (about 3 cm worth) still attached.
Some problems with equipment placement caused a mad scramble getting this piece from the furnace to the anvil, so by the time the hammer was striking the metal had dropped to the low oranges. Even still the material proved to be forgable metal, at a guess a mid carbon steel (no grinder was available for spark testing).

For the second cycle, the metal used was a piece about 30 cm long of recycled wagon part, flat bar about 1/4 x 1 inch stock. The material had earlier been tested an appeared to be a lower carbon steel (not actual wrought iron) and was heavily surface pitted. The bellows operation for this sequence was far less consistent, with a lower air volume on average and thus both lower temperatures and longer consumption rate of fuel. This created both a slower conversion of the bar and also suggested more possible soak time to absorb carbon from the interior. In actual fact the end result proved to be a high carbon cast iron. The puck of material produced was not forgable, fragmenting under the hammer.

On the last cycle, the metal used was a piece of 3/8 square mild steel bar, again about 30 cm long, recovered from a damaged fire tool. A number of people took turns on the bellows, most significantly Sam, who had his blacksmithing experience from his Ango-Saxon forge to guide him. The air rates fluctuated most widely over this cycle. This again could be seen in the results. The metal fragmented under the hammer, with the bottom half splitting off clearly as brittle cast iron. The upper portion of the puck appeared to be useable metal, but was certainly tougher to shape that the metal from cycle one. On a guess this material should test out to a higher carbon tool steel.

Although the furnace did come through its repeated uses in reasonably good shape, it did not survive being dropped out of the truck while being unloaded the next day.

The method of manufacturing the furnace was well demonstrated, and the horse manure / clay mix seems idea for the construction. The general principle of this small steel furnace was again proven. It remains clear that bellows operation is the largest variable, with experienced operators being critical to the function of the furnace. The great advantages of this furnace, ease of construction and speed of a single use cycle was again demonstrated. More work needs to be done to fine tool the correct sequence, which repeated uses to accumulate experience will provide.

Labels: , ,

Wednesday, July 2, 2008

Working the Glass Furnace

This is a wonderful shot (on several levels) taken by Karen on my camera.

Our youngest participating member, Snori, is seen here working the bellows on the glass furnace.

First thing that struck me, both seeing her work and what is clear in this image, is her correct hand position. Snori took a turn on the bellows as so many others did, while her mom (Jorunn) was at the working end of the furnace.
Late in the second day, some tinkering was done on the bellows by our most experienced bellows operator to arrive at a best possible physical method to work this equipment. Something that is not immediately obvious to the new user is that there is a specific way to correctly manipulate a given bellows for a given furnace requirement. On the bead furnace, the problem is not volume of air, but in fact maintaining as close to a CONSTANT flow of air as is possible. For the standard Norse double chamber bellows, the trick was to work off the 'top half' of the possible lift of the two chambers. It was not required to actually put any force downwards on the handles. The weight of the wooden top plate was more than enough to create the air volume required. You can see that Snori's hands are positioned so that she can lift up the handle to fill each bag, but then just drop the chamber. This requires very little actual muscle, but does require some attention to the rhythm. Snori's attention to the task actually produced a cleaner, more constant flow of air than what came from the hands of many of the adults (who 'assumed they knew how' to work the bellows).

Darrell

Labels:

Coffee Time at Trillium Wars

Just in case you thought all that happens in a DARC camp is all serious and historic:

This is Kettil first thing in the morning before he has had his coffee.This is Au∂r first thing in the morning before she has had her coffee.Or more just like she is just getting her coffee. Can't have Einarsson camp coffee without whipped cream. Can't have whipped cream without a cherry on top (in this case a small strawberry - '..we have to make some concessions for being at the front..') Note spot of whipped cream on the nose.

DARC historic camp rules have been carefully crafted so that we can all have our much needed camp coffee in the mornings.

Darrell

Labels:

Tuesday, July 1, 2008

Melting Glass

This past weekend at the SCA's Trillium War event, DARC set up two experiments. I'm sure that Darrell will post about the new smelter. This post is about the bead furnace.

Last Fall we made up a "Mark I" furnace and tried making some beads. The report is here. This year we created the "Mark II" and burned it on June 14th (along with the smelt) and this last weekend.

I'll add some reports later, but here is a quick summary. For those who need the background...

The Vikings not only loved beads, it is pretty clear that they made them. At Ribe in Denmark, they found a number of what appear to be bases for bead making furnaces, along with the usual debris that makes us fairly sure that it was indeed bead making going on - broken glass beads, tesserae, crucibles, stringers, and so on.

This is the second furnace we have made in this experiment series. Its' base pretty closely matches the size of the bases from Ribe.


As you can see, this was set up with the bellows on one side, with two operators on the other side. Additional openings exist on the bellows side for adding charcoal and crucibles.

Aside from one minor experiment with a crucible and pulling a stringer we focused on making beads. Two main techniques were employed - the usual lampworking technique employing glass rods; and an attempt to build up beads using an artefact similar to the warming plate from Ribe.

We welcomed a number of visitors who had the chance (after serving a shift on the bellows) to make a couple of beads.

This is the first day's results.


And some of the second day's results.


Some quick notes:

The first day we had a pretty rough breakage rate. Beads either broke coming off the mandrils, or broke in the annealing pot. 6 of about 25 survived.

On the second day, I think we had better luck but I was so busy talking to people about the beads and furnace that I didn't keep notes on bead numbers. I would estimate 50% survived.

Clearly, annealing and the mandrils are areas we are going to have to work on.

We also had a significant problem with ash speckling the bead surfaces. Interestingly, this makes them look like many of the beads on Dan Carlson's bead CD. I'm not sure whether the surface texturing of the Gotland beads is a result of ash or if it had another source. Beads from other locations do not necessarily show this texture.

The technique of picking up glass fragments from a "warming plate" inside the furnace to make your beads was reasonably successful -- at least in creating the beads.

On day three, the furnace broke as we started to clean up. A shame, but hardly a real problem - we'll make a new one. The breakage, however, provided an opportunity to both examine the structure and discuss improvements. The "Mark III" will be produced in the next few weeks and we'll see what happens.

The best part of the breakage was when we cleared the walls away to see the base. I'll compare these photos to the archaeological reports from Ribe in a later post.


Look for the reports soon!

Neil

Labels: ,

      Updated: 4 Dec, 2007
Text © Dark Ages Recreation Company, 2007
Photographs © Individual artists
Copyright details
Contact us