sml logo Dark Ages Re-Creation Company sml logo

Wednesday, July 22, 2009

IRON Mandrils - Iron Oxide bead release?

"Ancient beads were often made on cast iron tapered rods, without the use of a separating agent. Once a bead was finished, the rod was heated to red-hot and plunged into a container of salt. This created a chemical reaction, causing the cast iron to rust and the bead could be easily tapped off the rod."


Quote from www.timelessbeads.net/islamic_folded.htm

(Note: In all fairness to Jhan, her interest lies in duplication of historic beads using modern flame working tools and methods. She clearly references that someone else told her this, so I am not critical of her otherwise quite good web site!)

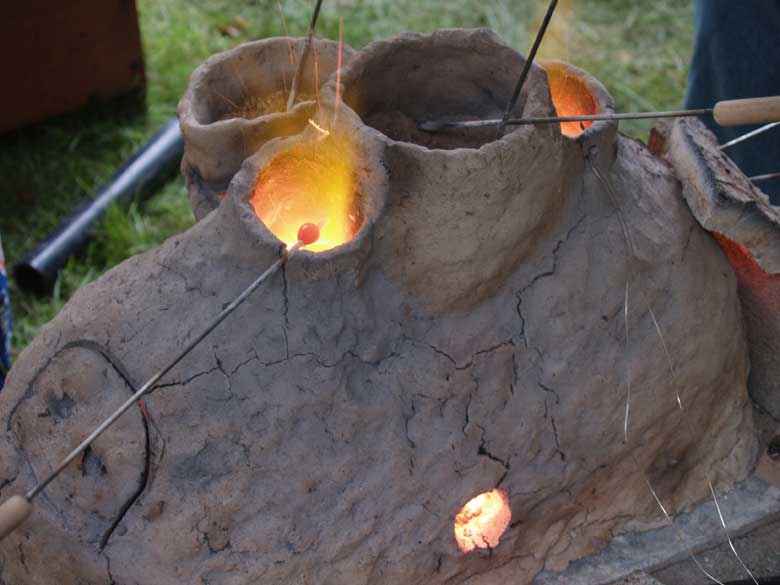
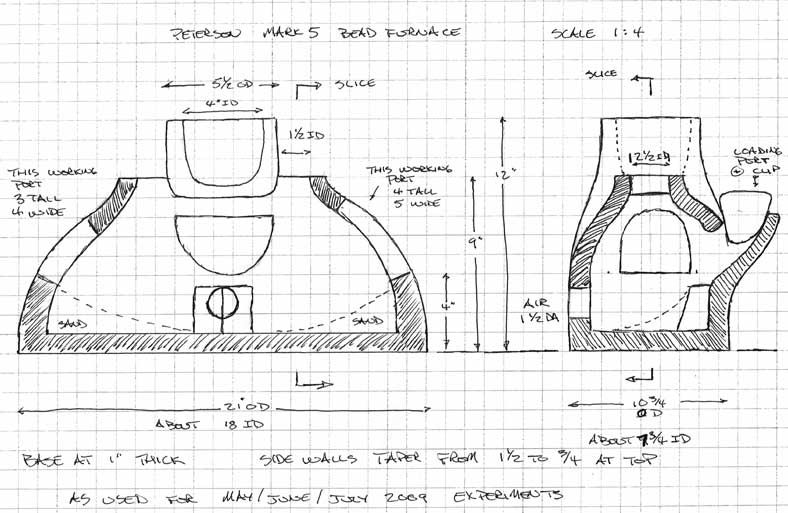
First, what is being referred to here are artifact wrought iron mandrils. Two have been found in the Viking Age layers at Ribe, Denmark. (This is the focus of interest of Neil Peterson's experiments with DARC.)

As an experienced metal worker, I do want to stress the actual material. There is a significant difference, both chemically and structurally, between the various different iron based metals that might have been used. This also extends significantly to the oxidation rates.
I know that 'cast' iron was not used historically. This high carbon alloy was not clearly understood or widely employed for any purposes until into late Renaissance times (varies depending on location, much earlier in the East).
Most likely is some form of bloomery or wrought iron, the low carbon material most commonly used for all forged objects up till the Industrial age.
For comparison, modern mandrills are typically a nickel alloy (stainless) which basically did not exist until fairly recently (the Modern Age - say 1900). This material is used because of its great *resistance* to oxidation.

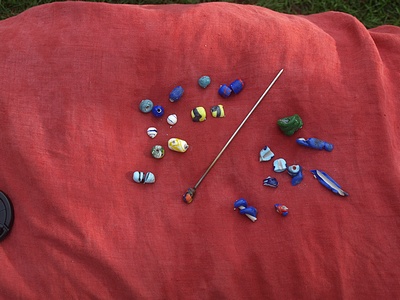
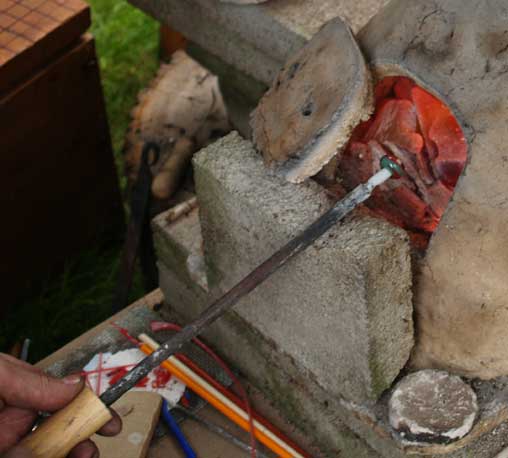
I have made up one actual 'wrought iron' mandrill, using antique recycled metal (on a guess from the late 1800's). This specific material most closely matches the bloomery iron that would have been available during the Viking Age. The form is (loosely) based on one of the artifacts from Ribe. The shaft is about 30 cm lng and is mounted into a wooden handle. The fairly heavy cylindrical body shoulders in near the tip for about the last 3 - cm. The diameter here is roughly 3 mm, tapering slightly to the end. To date we have primarily been using a fairly standard method of coating the working area with a clay resist.

I have reservations that the theoretical salt water quench method as described would actually work in practice. There are two primary forms of iron oxide in play here. Chemically these are Fe3O4 or Fe2O3:

The first (Fe3O4) is the high temperature form - black oxide or fire scale. It is hard, brittle, and adheres both tightly and strongly to the parent metal. Its formation is fast - due to the temperatures (above about 450 C or so). I just can not see this being of any value to the bead making process, as the glass strongly attaches to this layer, then due to the bond between the oxide and the metal, it remains firmly in place.

The second (Fe2O3) is the low temperature form - red oxide or rust. This layer is soft and crumbly, and breaks away easily under any mechanical pressure. Generally this is a slower formation, taking place at room temperatures. This process is accelerated (ask the chemists why) by water, and a bit more so by salt water. Now, it might be possible to use this layer as resist, as it does easily break free from the parent metal. This layer is certainly extremely thin. This presents two problems. First - there is not much separation layer to begin with, so it would be extremely easy to scrape it completely off and expose the metal underneath. Second - the layer is so thin that it conforms closely to the shape of the parent bar. The interior of the glass wraps tightly around any irregularities in the metal mandril. Although every attempt is made to produce a mandril with a perfect cylinder, or a slight conical section, one of the functions of a thicker resist layer is to lift the glass away from any imperfections. Such a thin layer as the oxide would create would just not give enough gap between metal and glass.

I should mention that one observation I have from forging actual wrought iron is that when it is quenched from incandescent in water, often a thin film of red iron oxide will form on the surface. As suggested, the quality of the iron does effect this. However, given the problem of creating a suitable 'release gap' I still think that this natural oxide layer is just not thick enough. Even with the slight acceleration produced though the use of salt water, the layer of Fe2O3 created would far to thin to be significantly useful here.

I suspect that this whole idea was theoretically reverse engineered to explain observations of a special situation. I believe (?) some glass beads were found to have a very thin layer of iron oxide in the interiors of the holes. How to explain this? Pair this observation with the discovery of a couple of wrought iron mandrils. Presto! A working method, now enshrined in the literature (although never actually tested). Repeat that WAG, until it has become an accepted method (still not tested).

An alternative : given the wide availability of various iron oxides as ochre deposits, perhaps a well known resist material was simple red ochre mixed with water as a paste. This applied just as we do our fine clay. This is a method that would be easy to test experimentally.

Additional tests:
- As Neil Peterson has mentioned, examine only BROKEN artifact bead fragments from production sites to check for the presence of resist. We know that the thin clay layer is fragile, and relatively quickly will clean away from the interior of any bead actually worn on a string. This does tell us beads found removed from production sites may not yield useful information.
- We tend to take a very long time to make a single bead. Historic production work is sure to be much faster. The way the clay interfaces to the glass is sure to be time dependent. Is there any way to check on this?

Labels: ,

Monday, July 20, 2009

Working System - Bead Furnace


Peterson Mk 5 Bead Furnace - July 18. 2009Showing the overall layout of working ports on the furnace

The Mk 5 furnace is again laid out with working areas for two people, one on either end of a roughly oval furnace, which has air input and charcoal loading on either sides of the centre. At the top centre is a built in cup for annealing, for this test holding sieved wood ash. The loading port (not seen here) has a second cup which inserts into the opening. In this test this second cup held vermiculite.
Each worker has the choice of using an upper port, allowing for manipulation of the glass in the hot exhaust gasses. A second covered port in the side of the wall can be opened, allowing for working down inside the body of the furnace. This method was used for experiments with tesseri. (see the video segment posted earlier)

A thermocouple type pyrometer was employed to roughly measure exhaust gas temperatures at one of the top ports over the experiment. A roughly 6 mm (1/4 inch) diameter hole was drilled into the wall of the furnace, just down from the lip of of the port. The probe was extended into the opening about 1 cm. Although the probe was placed early in the experiment, and readings were constantly monitored, unfortunately the recorded data only extended over a relatively short time sequence:

Temperature Data (C)


TIMETEMPEVENT


1:03900
1:041000
1:07900
1:09700
1:10800
1:11
charcoal fill


change method
1:15755
1:16655

adjust charcoal
1:17925
1:18810
1:19850
1:20890


adjust charcoal
1:21910
1:22830
1:23860
1:24870
1:25840
1:26850
1:27820

Darrell Markewitz

Labels:

Sunday, July 19, 2009

Beadmaking - Working with Tesseri


Neil and Karen from DARC held a workshop / experimental session on Saturday July 18. A small group of us spent the afternoon working with the Mark 5 charcoal bead furnace, primarily working out the best firing dynamics and continuing to transfer our skills with modern torch working methods backwards into the Viking Age.

The furnace used above is based on base plates found in the excavations at Ribe, Denmark. The superstructure remains speculative, being refined in detail as our working experience increases with the equipment. With each session, the ratio of successfully completed beads increases - a sure sign that something is improving!

One note - for this last session, a modern electric blower was used to supply the needed air.

(Darrell)

Labels:

Bead Furnace - scaled drawing


This diagram style drawing was created from measurements taken on July 18 at the bead experiment session hosted by Neil and Karen.

Labels:

Friday, July 17, 2009

Email on Beads

I got an interesting email this morning that deserves sharing. I have reworded the query a bit as the original email was from a non-english speaker (who did a reasonable job asking his question in my language - which is always appreciated).

> Could you explain the bead indexes Callmer uses?
> For example:
> B 422 Dark Blue T.
> I am interested in B422 (number of graves, number of beads found)?

While I am not ready to email people with information about each and every kind of bead in depth, this provides a good opportunity to discuss this further.

In 1977 Johann Callmer wrote a thesis TRADE BEADS AND BEAD TRADE IN SCANDINAVIA ca. 800-1000 A.D. (ISBN: 91-40-04466-1). Although there are significant problems with his typology the fact is that no-one has offered a better or more complete model, and it serves well for comparing beads.

In it Callmer tagged beads according to various criteria:
Length - measured along the string
Diameter - measured across the string
Proportion - the ratio of these two numbers
Colour - the background colour of the bead
Transparency - how clear the bead is
Decoration - is it monochrome or what kinds of decoration are applied
shape - the overall shape of the bead
construction method - drawn or worked
material - glass, stone, etc

Classes (such as B422) were then made by taking beads with similar criteria. The classes were then examined for trends.

B422 is one of those classes. They are decorated glass beads (type B) with a Dark Blue (colour 214) Transparent (translucency=181) base glass. The beads are cylindrical (shape=127), or rounded with (shape=124) or without (shape=122) flat ends. (see http://www.darkcompany.ca/beads/BeadShapes.php for shape pictures)

The length of the bead is at least 1/2 of the diameter (proportions 152, 153 and 154). The diameter is between 9 and 23 mm (size=164 to 168). It is decorated with a variety of types of lines (lines 311-315 in patterns 742,722,829,828,788,792 see his Fig 2 and Fig 3 for the patterns involved).

All of these definitions are in chapter 3 of the thesis.

In Table 1 Callmer tells us that B422 was popular in BPI(790-820), and dieing off in BPII(820-845). It isn't found again until BPVII(885-915), peaks again in BPVII(915-950) and finally vanishes during BPVI(950-960).

In Chatper 2 he documents 14 graves with 21 of these beads. Worth noting is UUM 4318 UP, Häggeby parish, Overhassla which has 5 of the 21 beads. The other graves are all 1 or 2 beads.

It is occasionally possible to get Callmer as a used book, and Inter Library Loans can pull it from many larger universities. This is an excellent source to begin looking at beads in the Viking Era.

Neil

Labels:

Wednesday, July 15, 2009

Three New Activity Pages

We will likely still add some more pictures and links there are three new pages up on the site.

http://www.darkcompany.ca/beads/bead0509/
- a bead melt with two furnaces. Not a very successful day but a chance to try a new furnace design.
http://www.darkcompany.ca/beads/bead0709/
- another bead melt with two furnaces. Much more successful with training for many new bead makers.

http://www.darkcompany.ca/iron0509/
- our most recent iron smelt - the first try at the reproduction of the smelter from L'anse aux Meadows.

Neil

Labels: ,

Saturday, July 11, 2009

Gas Jet Bead Furnace MK 3

(cross posted from 'Hammered Out Bits')
... referred to (why?) by Neil and Jean as the 'tea pot' style.

{ed.Karen: because it looks like a teapot:) }

About the time Neil Peterson got seriously interested in compiling tables detailing just what forms, colours and shapes were common during the Viking Age, I had been introduced to the modern methods of making lampwork beads. At Dan Nickels' 'Folly in the Forge' workshop, a local glass bead maker had demonstrated the basic technique. Along with fellow blacksmiths David Robertson and Janis Book, some basic supplies and Corina Tettinger's (excellent) manual 'Passing the Flame' were purchased. Over the next several months, I had made about 100 beads using my oxy-propane torches, gaining at least a basic understanding of how tohandle hot glass in rod form.

Neil's experiments proceeded with a furnace based on the base plate remains from Ribe, Denmark, with a superstructure suggested by traditional Indian models. These used a dome like enclosure, with small working ports into the interior to contain the required heat. The glass would be manipulated inside the furnace through these ports. Neil is now working his fifth version based on this system.

In spring 2008, I had a chance to meet with Trene Theut, an artisan interpreter at the Ribe Viking Centre, and its glass bead specialist. At that meet, Trene described her most recent experimental furnace. The next day I was able to see this furnace on my visit to the site itself.
(Trene's Experimental Gas Jet Furnace at the Ribe Viking Centre)

The initial concept behind Trene's set up was to trap and utilize the hot gasses from the charcoal fire, rather than work inside the furnace itself. The combustion gasses escaped from small vent in the top of the roughly cylindrical clay structure. In this way the manipulation of the glass was physically more like working with a modern torch flame.
Although not designed specifically for this method, those working with Neil's 'oven' design, more and more were found to manipulate the glass in the 'chimney' holes in the top of the structure. (See Video Segment)
(Mark 2 'Teapot' Gas Jet Furnace in use)

To that end, a first attempt at a building a specifically gas jet furnace was undertaken at the July Trillium War demonstration. This specific layout was quickly found to be quite unsuccessful, as the upper gas jet never produced enough heat to do much more than slump the glass rods used as a raw material.
Taking a close look at Neil's first rendition of the system, I thought I could apply some of my experience with charcoal fired forges to the design.
(Theoretical Gas Jet Bead Furnace - scale 1:2)

One of the biggest problems with the Mark 2 layout was found to be the sloppy fit between the large side loading port and the inserted annealing cup. The large gaps here were found to be venting as much (if not more) of the hot combustion gasses as the top working vent. One of the largest changes in the new furnace is that instead of a side loading port for charcoal, it is designed in two sections so that the entire top can be lifted off to add fuel. The top rim of the lower section is beveled, so that the upper body would quickly slide back to the correct location when it was replaced after loading.
A second major modification, is the change in the shape of the lower section of the furnace. Rather than an elongated D cross section, this proposed furnace is more of an 0 shape. The bellows tube is placed so that the distance below the furnace is roughly equal to the side to side measurement. This will allow the air blast to completely penetrate the charcoal mass, as well as cause any piled fuel to move down and into the air blast as it is consumed. A small hole into the interior, located roughly two inches above the bellows tube opening, would allow the operator to directly observe when the top of the charcoal had dropped to a level where addition was necessary.
In this arrangement, the bead maker sits directly opposite the bellows. There would be a small port with replaceable cover at the middle level of the side wall, allowing working of tesseri inside the furnace itself. (This using the method discovered at the Trillium demo, detailed in an earlier posting.)
Most of the detailed glass work is intended to take place in a second small chamber placed at the top of the furnace, directly over the exhaust port for the combustion gasses. This would have a single small opening, placed on the side closest to the glass worker. The very top of the furnace would have a shallow cup, intended to be filled with ashes to provide an annealing area headed from below.

With luck a first prototype of this modified furnace - MK 3 - will be built and tested later in July.

(Darrell)

Labels:

Monday, July 6, 2009

Glass Bead Making Furnace


Neil / Ragnar working with the mark five experimental bead furnace.
Trillium War, Whitby ON - July 4, 2009

This furnace is based on the base plate remains found at Ribe, Denmark, dating from the early Viking Age. There was no superstructure preserved, so a number of top designs have been experimented with. The combination of top vent and side port with cover appears to be the most flexible. Most likely a mark six design will be built, as new knowledge is gained every time a serious work session is undertaken.

One key techinque was stumbled upon (pretty much by accident).
An ongoing puzzle has been how the Norse worked with glass tiles (tesseri) as their source of raw glass:

This is a direct method (rather than involving a melting pot or creation of glass rods as intermediate step).
- work is done inside the furnace through a side port
- glass tiles placed on flat surfaced piece of charcoal (which can be used two or three times)
- wait till glass tile heats till edges just start to slump
- make sure your mandrel is well heated (to orange)
- touch mandrel to one corner of the tile to affix small corner of glass
- raise and twirl mandrel. This effectively pulls a stringer shaped finger of glass off the tile.
- now the process is like working with a rod, thickness of the stringer is controlled mainly by height the mandrel is lifted above the tile.
- This appears to reduce the amount of ash contamination, plus produce a correctly shaped bead (rather than the irregular shape produced by grabbing the entire tile at once.

Check the main DARC web site for more information on Neil's ongoing research and experimentation into VA glass beads and their production.

(Darrell)

Labels:

Sunday, July 5, 2009

Another glass bead melt

At a local SCA event this weekend we set up two bead furnaces - the standard oval and one of the newer teapot style. We spent the day Saturday working with new people giving them a chance to try making a bead in the oval, while squeezing in a little time to try a couple of things ourselves.

Quick summary
- two annealing areas - between the chimneys & the crucible in the side. The pot on top reached a temperature of 695C (1283F) while the crucible reached 598C (1108F). Both of these temperatures are well above the 900F we need for annealing. In fact we had a problem with one bead (it picked up a lot of the vermiculite we had in the pot) this might have happened due to the glass getting too hot. This needs to be retested with ash as the insulator rather than the modern vermiculite.

- Much better success rate - 25 beads survived, 13 broke. Given the number of first time bead makers this is pretty good. It will be interesting to see what happens when we can do a run with just experienced bead makers for a day. I'd like to see a higher overall number of beads and a higher success rate.

- Maintaining a useful temperature is HARD in these furnaces. A charcoal load gives time to make a single bead at each side. Tiny changes in the direction of air inflow can make big changes. We need a method of slowing adding charcoal to try to keep a more consistent temperature rather than adding a bunch waiting for it to heat up, the making a bead and repeating. We also need to track the stability of the temperatures in the annealing area rather than just the single point reading I snuck in.

- The teapot furnace had even more difficulties. The fuel load was small enough, and the airflow directed enough that the fuel in the middle of the base burned off but the fuel around the outside wouldn't move in. This implies a cone shaped bottom to help the fuel flow better. In addition the crucible in the spout was not a great fit meaning more heat escaped around it than came out the chimney when it was intended.

- In the oval furnace the smaller chimneys meant working in the chimney was more effective than working in the ports - at least when working with rods. The tesserae require a different approach.

- Darrell had some real luck working with tesserae creating 3 good sized beads that survived. We think we have a solid working method for this, now we just need to test it further.

- I am still troubled by the relationship between the archaeological remains and the remains after we are done. The Ribe pads seem to be flat pieces, finished (not with remains of walls attached to the pad. Yet even when we don't deliberately join the base to the walls we when we break down the furnace we still don't reproduce the archaeological remains. There are clearly some construction details remaining to work out.

Neil

Labels:

Saturday, June 27, 2009

Making Bead Furnaces

Today was about preparing for another experiment in glass bead making next weekend at a local SCA event. The goal was to produce two cobb furnaces.

The process begins by slipping over to the neighbour's to borrow a bucket of horse manure. Thankfully the weather has been hot and dry the last day or two so it was easy to get some that was well dried and broke up easily. The first step is to break up the whole bucketful.


To this we add a bag of Ball Dark clay


Stir well, add water, and just keep mixing until you have a good cobb to work with


And hey presto out pops two furnaces


The one in the background is becoming a standard design for this work. The base is a 30x60cm oval matching one of the bases found at Ribe. This style can be set with two working ports - one on each short side. The port for the bellows is in the center of the long side. Opposite that port is a chute for loading charcoal currently blocked with a crucible for annealing. At the top are two chimneys with another pot for annealing between them.

Annealing is a problem we are working on and having two options to measure for temperature will allow us to explore some options. The crucible sitting in the side is one option we haven't tried before. The pot on top we have used before but this time I have made it deeper and thinned out the top of the furnace to increase the heat transmission. We will also try filling the pot with ash.

The furnace is the foreground is new for us. We nicknamed it the teapot when we tried it at the end of May. This design comes from Trine the beadmaker at Ribe and is similar to one she currently uses. It is based on a circular furnace base found at Ribe.

This furnace uses a burn chamber (the lower portion) and a small chimney at the top to allow the heat out. This chimney has a covered working area to allow the bead maker the work. On the side is the same charcoal chute (being cut out in the picture) and annealing crucible, and a port for the air from the bellows.

We played with a pure clay version of this furnace but had temperature control problems as the fresh clay broke down.

These two furnaces are built of cobb which will hold together better and are being let dry for a week before firing which will lead to a more stable furnace.

For both furnaces the upper surfaces are a guess as there are no archaeological remains I am aware of other than a few pieces of sintered cobb from Ribe that were found on top of one of the bases - that may be remains of the walls of a furnace.

Neil

Labels:

Tuesday, November 25, 2008

Bead Making Update

The bead experiments have finally been updated. The main page is now here. There are links for the four burns we did this year in June, July long weekend, July, Labour Day, in addition to the first experiment.

There are also pages for the archaeology, and some answers to some of our questions. The pages about glass beads, and stone beads have moved into the bead section. New pages have been added with summaries of beads and a brand new page which tries to classify beads for you - reporting which Callmer class a bead belongs to, or what similar classes exist.

Research and planning are on-going for next year's experiments.

Labels:

Tuesday, August 12, 2008

Beads from Danish Graves

I recently reviewed Brondsted's survey of Danish Viking era graves (1936 - Acta Archaeologica VII). The information is a little sketchy but he summarizes 345 graves including 314 inhumations and 41 cremations.

I added some notes to the bead page

http://www.darkcompany.ca/beads/beads.php


  • 49 graves (14.2%) have 1 or more bead

  • 35 graves have known numbers of beads (the others say only "beads")

  • Only 7 graves (2%) have 10 or more beads

  • For the 35 graves with known numbers:

    • the average (mean) number of beads is 8

    • the median number of beads is 3 (half the graves have under 3)

    • the mode (most common number) is 1


  • Of the 23 beads of known type & number

    • 17 are glass (red is the only listed colour)

    • 4 are amber

    • 1 rock crystal

    • 1 stone


  • Clay beads are also mentioned but without specific numbers

Labels:

Thursday, July 31, 2008

Bead Page Done for now!

The bead charts have all been created and posted. The bead article itself has been updated with more information about how to use the charts. Several small errors in the existing charts have been corrected, and the final bead period charts have been uploaded!

I am working to add more data from Dan Carlsson's Bead CD with the Gotland finds, and Lundstrom's work with the Helgo beads. That information will take a while to work in and is unlikely to change the charts.

Next bead update will be pages for the 3 bead making sessions we have done since the last update. So busy doing it is hard to make time to post about it!

Neil

Labels:

Sunday, July 6, 2008

Glass Experiment Questions

With three bead melts done, and another two in the planning stages it would be worth listing some of the questions facing us. I fully expect this list to expand with time.

Tools

Tool artefacts include two mandrills (one with a bead stuck on, one without), the 'warming plate'. Tweezers can be inferred from the impressions on the ends of some glass stringers.

Our current planned list of tools for each workstation is:

1. Long tweezers (placing glass in the furnace)
2. Short tweezers (handling stringers near the furnace)
3. Mandrels (a dozen or so)
4. Snips (cutting stringers)
5. Fire rake (adjusting the charcoal bed to provide a workspace)

There will also be shared tools
1. Long fire rake
2. Crucible tongs

This represents a LOT of iron tied up.

QUESTION: Could some parts of this work be done with soaked green twigs instead?

The warming plate and crucible bits are also an interesting question. How are they used?

QUESTION: Are the glass tesserae placed on the plate in the furnace, heated up and pressed onto the mandrel?

QUESTION: Would a ceramic plate work?

QUESTION: Can a piece of charcoal work? The answer to this seems to be yes as Darrell and Unnr have both made beads this way already.

QUESTION: Are tesserae placed in a crucible and melted, with stringers/rods being drawn out using tweezers?

Many beads are shaped, not just flat sides but deep ridges, cones, bicones. How was this done? For a modern lampworker there are shaped marvers of metal or graphite. No artefacts exist.

QUESTION: Can a soapstone marver do each of these shapes?

QUESTION: What about bone marvers?

QUESTION: What about a knife as one book theorizes?

Technique

Many of our beads show texture problems. These appear to fall into two groups:

1. Contact with walls/charcoal - this leaves a fairly visible mark. Similar marks do exist on some period beads, but with more skill development I expect this to gradually reduce in frequency.

2. Ash pitting. The surface gets touched by floating ash which leave small dimples in the glass or a rough texture. This texture is also visible on many (but not all) artefacts.

QUESTION: Is the pitting on the artefacts actually caused by ash or by another issue?

QUESTION: Can the working ports/air flow be adjusted to reduce/eliminate the ash impacts?


How are beads actually made?

Callmer's book lists several different construction techniques, some of which leave traces we can see in the artefacts, others of which would not be distinguishable. The artefacts include glass rods (0.5mm to 5mm diameters - thus stringers and full sized rods); tesserae (glass bits for making mosaics), and cullet (broken glass bits from drinking beakers etc)

QUESTION: Can you make beads by picking up broken bits onto the mandrel? (yes - see above)

QUESTION: Can you make beads using rods as modern lampworkers do? (yes - I have done this as have others)

QUESTION: How can we reduce the post - creation breakage? i.e. how can we best anneal the beads?

QUESTION: How can we reduce breakage as we pull them off the mandrel?

QUESTION: Is the tapered shape of the artefact mandrels important?

QUESTION: Was a release/slip used?

QUESTION: How do you overcome the problems of mixing glasses with different Coefficients of Expansion? (more annealing questions)

QUESTION: How can you make some of the shapes we see?

QUESTION: Do each of the methods Callmer shows actually work?

QUESTION: What are the specific signs that a particular technique was used? (if any)

This does not even begin to address the questions on work area layout we will be examining when the Mark III is built. The question is "what does the upper part of the furnace look like in terms of openings, texture, air flow patterns, chimney's and so on".

I think that should keep us busy for now....

Labels:

Wednesday, July 2, 2008

Working the Glass Furnace

This is a wonderful shot (on several levels) taken by Karen on my camera.

Our youngest participating member, Snori, is seen here working the bellows on the glass furnace.

First thing that struck me, both seeing her work and what is clear in this image, is her correct hand position. Snori took a turn on the bellows as so many others did, while her mom (Jorunn) was at the working end of the furnace.
Late in the second day, some tinkering was done on the bellows by our most experienced bellows operator to arrive at a best possible physical method to work this equipment. Something that is not immediately obvious to the new user is that there is a specific way to correctly manipulate a given bellows for a given furnace requirement. On the bead furnace, the problem is not volume of air, but in fact maintaining as close to a CONSTANT flow of air as is possible. For the standard Norse double chamber bellows, the trick was to work off the 'top half' of the possible lift of the two chambers. It was not required to actually put any force downwards on the handles. The weight of the wooden top plate was more than enough to create the air volume required. You can see that Snori's hands are positioned so that she can lift up the handle to fill each bag, but then just drop the chamber. This requires very little actual muscle, but does require some attention to the rhythm. Snori's attention to the task actually produced a cleaner, more constant flow of air than what came from the hands of many of the adults (who 'assumed they knew how' to work the bellows).

Darrell

Labels:

Tuesday, July 1, 2008

Melting Glass

This past weekend at the SCA's Trillium War event, DARC set up two experiments. I'm sure that Darrell will post about the new smelter. This post is about the bead furnace.

Last Fall we made up a "Mark I" furnace and tried making some beads. The report is here. This year we created the "Mark II" and burned it on June 14th (along with the smelt) and this last weekend.

I'll add some reports later, but here is a quick summary. For those who need the background...

The Vikings not only loved beads, it is pretty clear that they made them. At Ribe in Denmark, they found a number of what appear to be bases for bead making furnaces, along with the usual debris that makes us fairly sure that it was indeed bead making going on - broken glass beads, tesserae, crucibles, stringers, and so on.

This is the second furnace we have made in this experiment series. Its' base pretty closely matches the size of the bases from Ribe.


As you can see, this was set up with the bellows on one side, with two operators on the other side. Additional openings exist on the bellows side for adding charcoal and crucibles.

Aside from one minor experiment with a crucible and pulling a stringer we focused on making beads. Two main techniques were employed - the usual lampworking technique employing glass rods; and an attempt to build up beads using an artefact similar to the warming plate from Ribe.

We welcomed a number of visitors who had the chance (after serving a shift on the bellows) to make a couple of beads.

This is the first day's results.


And some of the second day's results.


Some quick notes:

The first day we had a pretty rough breakage rate. Beads either broke coming off the mandrils, or broke in the annealing pot. 6 of about 25 survived.

On the second day, I think we had better luck but I was so busy talking to people about the beads and furnace that I didn't keep notes on bead numbers. I would estimate 50% survived.

Clearly, annealing and the mandrils are areas we are going to have to work on.

We also had a significant problem with ash speckling the bead surfaces. Interestingly, this makes them look like many of the beads on Dan Carlson's bead CD. I'm not sure whether the surface texturing of the Gotland beads is a result of ash or if it had another source. Beads from other locations do not necessarily show this texture.

The technique of picking up glass fragments from a "warming plate" inside the furnace to make your beads was reasonably successful -- at least in creating the beads.

On day three, the furnace broke as we started to clean up. A shame, but hardly a real problem - we'll make a new one. The breakage, however, provided an opportunity to both examine the structure and discuss improvements. The "Mark III" will be produced in the next few weeks and we'll see what happens.

The best part of the breakage was when we cleared the walls away to see the base. I'll compare these photos to the archaeological reports from Ribe in a later post.


Look for the reports soon!

Neil

Labels: ,

Wednesday, May 28, 2008

Revised Ribe Bead Furnace

On my first evening in Ribe, I had arranged to meet with both Michael Nissen (iron) and Trine Theut (glass) from the Ribe Viking Centre. I offered to buy them dinner against pumping their brains. Trine had corresponded with Neil already about aspects of Viking Age glass bead making.
She had described her latest variation on the set of of the furnace. The next morning, I had taken what I had accumulated in my rough notes into this drawing.The suggestion of moving the inlet for the air blast both to the side and up off the floor of the furnace was my own suggestion. This based on my experience working with Norse blacksmith's equipment. (Curiously, she and Michael, who works 'two booths over', had never really discussed fire set ups before this evening.)

The next day, I had arranged a visit to the site to meet with the curator. Michael kindly offered to drive me out there and show me around his specific area in detail. Trine has her work station set up inside one of the period A frames (see the posting on tents). I was able to get a number of shots of the actual furnace she is working with: Showing the working area framed at the top of the furnace. From the rear, showing the low mounted belllows input hole. From the front, showing the charcoal feed port and the annealing pots used to plug this.
Effectively what Trine has come up with is a charcoal fired 'torch'. Once the new fuel is burning relatively smoke free, the front loading port is closed up using one of the 'annealing cups'. This forces all the hot combustion gases through the small hole into the upper working area. At this point she can use more or less standard lampwork techniques to work the individual beads. She says her control has improved drastically with this set up - as well as ease, speed and worker comfort. Charcoal consumption has also been reduced.My revised working drawing of a possible set up.
The small circular pan now becomes a much more obvious and useful tool. It can be used to slowly heat pieces of glass towards working temperatures without shocking the surface. Individual fragments of colour or braided threads can be warmed then placed around the hole to be picked up on the hot glass bead as it is worked. The initial gather of glass is applied to the rod / mandrel by first heating the iron to orange. Note that the mandrel is now not any place near heat except for its working tip.

Expect several versions of this small (easy to build and transport) clay cobb furnace to be set up and tested over this summer.

Labels: ,

      Updated: 4 Dec, 2007
Text © Dark Ages Recreation Company, 2007
Photographs © Individual artists
Copyright details
Contact us